이번 시간에 한 것 한 줄 정리 : DirectX로 무언가를 하기에 앞서 세팅을 한다.
Windows desktop application 새 프로젝트를 GameCoding이란 이름으로 만든다.
실행을 해보면 윈도우 창이 실행된다.
Source Files에
99. Headers라는 필터를 만들고 헤더 파일을 넣는다.
01. Main라는 필터를 만들고 GameCoding 파일을 넣는다.

그리고 GameCoding 프로젝트 우클릭을 해서 properties(속성)을 열고, C/C++에 precompiled header(미리 컴파일된 헤더)라는 곳이 있다.
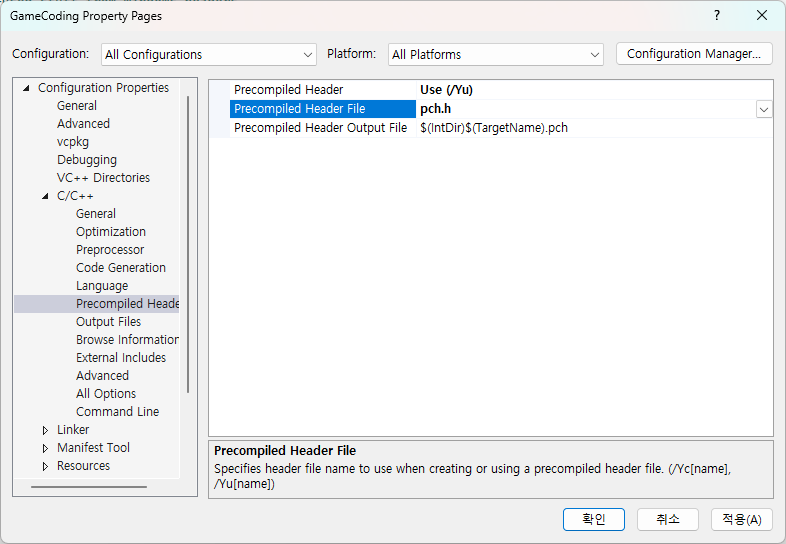
이렇게 설정을 한다.
99. Headers 필터 안에 Andromeda 필터를 만들어 pch 클래스를 생성한다.
pch.h에 공용으로 사용할 기능들을 넣어주면 편리하게 사용할 수 있다.
바로 앞서, 프로젝트의 properties에서 pch.h를 사용으로 설정한게 모든 .cpp파일에 적용이 되는 것이기 때문에 pch.cpp를 우클릭하고 properties에서 precompiled header (미리 컴파일된 헤더) 칸을 use(사용)이 아니라 Create(만들기)로 바꿔줘야 한다 .

이 상태에서 빌드를 하면 error C1010: unexpected end of file while looking for precompiled header. Did you forget to add '#include "pch.h"' to your source? 라는 에러가 나는데 GameCoding.cpp로 가서 가장 윗줄에 #include "pch.h" 코드를 넣어 해결한다.
99. Headers 필터에 새 항목 추가를 선택해서 헤더 파일을 선택한다. Struct.h, Types.h, Values.h를 만든다.
Types.h는
#pragma once
#include "DirectXMath.h"

using int8 = __int8;
using int16 = __int16;
using int32 = __int32;
using int64 = __int64;

using uint8 = unsigned __int8;
using uint16 = unsigned __int16;
using uint32 = unsigned __int32;
using uint64 = unsigned __int64;

using Vec2 = DirectX::XMFLOAT2;
using Vec3 = DirectX::XMFLOAT3;
using Vec4 = DirectX::XMFLOAT4;
using Color = DirectX::XMFLOAT4;
Values.h는 고정적으로 사용한 값들을 넣어 놓을 것이다.
#pragma once
#include "Types.h"

const int32 GWinSizeX = 800;
const int32 GWinSizeY = 600;
그리고 Struct.h의 경우는 아직까지는 사용 안하는데 공용으로 사용할 Struct들을 넣어 줄 것이다.
#pragma once
#include "Types.h"
그리고 pch.h로 가서 많이 사용하는 애들을 모아 놓을 것이다.
#pragma once

#include "Types.h"
#include "Values.h"
#include "Struct.h"

// STL
#include <vector>
#include <list>
#include <map>
#include <unordered_map>
using namespace std;

// WIN
#include <Windows.h>
#include <assert.h>

// DX
#include <d3d11.h>
#include <d3dcompiler.h>
#include <wrl.h>
#include <DirectXMath.h>
이렇게 하고,
텍스쳐 같은 거 로딩할 때 외부 라이브러리에서 골라줘야 한다. directX tex라는 애를 사용할 것이다.
프로젝트 우클릭 properties(속성)에 간 다음에
General(일반)으로 가서 Output Directory(출력 디렉토리)에 가서 어떤 디렉토리에 완성이 될지를 골라줄 수 있는데
$(SolutionDir)Binaries\ 이렇게 적는다.
라이브러리를 사용하겠다고 하면 라이브러리의 헤더파일들을 모아둔 폴더 하나랑
라이브러리 파일 자체가 들어있는 경로도 알려줘야 한다.
C/C++의 general의 Additional Include Directories (추가 포함 디렉토리)에 가서 편집을 누르고
$(SolutionDir)Libraries/Include/ 를 적는다
Linker(링커)의 General(일반)에서도 똑같이
Additional Library Directories (추가 라이브러리 디렉터리)에 가서
$(SolutionDir)Libraries/Lib/ 라고 적는다.
그리고 탐색기로 가서 SolutionDir인 GameCoding 폴더에 Binaries 폴더를 만든다. 빌드를 하면 결과물이 여기에 나오게 될 것이다.
그리고 Libraries 폴더를 만든다. 그리고 그 안에 Include와 Lib 폴더를 만든다.
빌드를 해보면
결과물이 Binaries 폴더에 만들어 지는 것을 볼 수 있고,
외부에서 Library를 다운 받으면 Libaries산하에 배치를 시킬 것이다.
라이브러리 갖고 오는 방법이 여러가지 있다. 예를 들어 DirectTex라는 라이브러리를 사용할 때, 마이크로 소프트에서 어떻게 배포하는지에 따라가지고 달라질 수 있다.
DirectXTex를 구글에서 검색을 하면 깃허브를 통해 제공을 하고 있다.
다운로드 해서 소스코드를 빌드해서 넣어주거나,
검색해서 헤더와 lib 파일만 다운 받아서 넣어 줄 수 있다.
여기선 다운 받아 lib 파일이 있는 Lib 폴더와, .h파일과 .inl이 있는 Include 폴더를 복사해 붙여넣기를 한다.
이렇게 하면 넣어준 라이브러리의 사용 준비가 끝난 거다.
다시 pch.h로 돌아가면, 이제 방금 넣어준 라이브러리 DirectXTex를 사용할 준비가 된 것이다.
#include <DirectXTex/DirectXTex.h>
#include <DirectXTex/DirectXTex.inl>
이게 되는 이유는 프로젝트의 속성의 C/C++의 일반에서 추가 포함 디렉토리에 $(SolutionDir)Libraries/Include/ 를 넣었기 때문이다. 모든 기본 경로에서도 못찾으면 추가 경로까지 뒤져 해당 헤더가 있는지 체크해 보라고 설정해 줬기 때문에 얘네를 찾아 볼 수가 있는 것이다.
using namespace DirectX;
using namespace Microsoft::WRL;
이것도 추가해 주고 (용도는 나중에 알게 될 것이다)
이렇게 header, lib 파일의 경로를 알려주는 것으로 끝나는게 아니라 라이브러리를 사용하겠다고 설정을 해줘야 하는데 프로젝트의 속성의 링커의 Input에 가서 해줘도 되고
#pragma comment(lib, "d3d11.lib")
#pragma comment(lib, "d3dcompiler.lib")
이렇게 써줘도 된다.
마지막으로 다운받은 lib도 받아 줄건데, release와 debug모드냐에 따라 다른 걸 사용한다.
#ifdef _DEBUG
#pragma comment(lib, "DirectXTex\\DirectXTex_Debug.lib")
#else
#pragma comment(lib, "DirectXTex\\DirectXTex.lib")
#endif
여기까지 해줬으면 헤더 파일과 관련된 준비가 끝났다.
여기까지는 WinAPI에서 했던 작업을 한 것이다.
01. Main 필터에 Game이라는 새로운 클래스를 만든다.
GameCoding.cpp에서 불필요한 코드를 삭제하고
#include "Game.h"를 추가하고,
#include "pch.h"
#include "framework.h"
#include "GameCoding.h"
#include "Game.h"
게임에 적합하게 while부분을 수정한다.
#include "pch.h"
#include "framework.h"
#include "GameCoding.h"
#include "Game.h"

#define MAX_LOADSTRING 100

// Global Variables:
HINSTANCE hInst;                                // current instance

// Forward declarations of functions included in this code module:
ATOM                MyRegisterClass(HINSTANCE hInstance);
BOOL                InitInstance(HINSTANCE, int);
LRESULT CALLBACK    WndProc(HWND, UINT, WPARAM, LPARAM);

int APIENTRY wWinMain(_In_ HINSTANCE hInstance,
                     _In_opt_ HINSTANCE hPrevInstance,
                     _In_ LPWSTR    lpCmdLine,
                     _In_ int       nCmdShow)
{
    // 1) 윈도우 창 정보 등록
    MyRegisterClass(hInstance);

    // 2) 윈도우 창 생성
    if (!InitInstance (hInstance, nCmdShow))
        return FALSE;

    MSG msg;

    // Main message loop:
    while (msg.message != WM_QUIT)
    {
        if (::PeekMessage(&msg, NULL, 0, 0, PM_REMOVE))
        {
            TranslateMessage(&msg);
            DispatchMessage(&msg);
        }
        else
        {

        }
    }

    return (int) msg.wParam;
}
Game 클래스가 들고 있어야 하는 몇가지 함수를 만들어 준다.
Game.h
#pragma once
class Game
{
public:
	Game();
	~Game();

public:
	void Init(HWND hwnd);
	void Update();
	void Render();

};
Game.cpp
#include "pch.h"
#include "Game.h"

Game::Game()
{
}

Game::~Game()
{
}

void Game::Init(HWND hwnd)
{
}

void Game::Update()
{
}

void Game::Render()
{
}
이렇게 모양만 만들어 놓은 다음에
GameCoding.cpp의 wWinMain에 가서 Game을 넣어준다.
int APIENTRY wWinMain(_In_ HINSTANCE hInstance,
                     _In_opt_ HINSTANCE hPrevInstance,
                     _In_ LPWSTR    lpCmdLine,
                     _In_ int       nCmdShow)
{
    // 1) 윈도우 창 정보 등록
    MyRegisterClass(hInstance);

    // 2) 윈도우 창 생성
    if (!InitInstance (hInstance, nCmdShow))
        return FALSE;

    Game game;
    game.Init(hWnd);

    MSG msg = {};

    // Main message loop:
    while (msg.message != WM_QUIT)
    {
        if (::PeekMessage(&msg, NULL, 0, 0, PM_REMOVE))
        {
            TranslateMessage(&msg);
            DispatchMessage(&msg);
        }
        else
        {
            game.Update();
            game.Render();
        }
    }

    return (int) msg.wParam;
}
GameCoding.cpp에서 필요 없는 것을 삭제한다.
#include "pch.h"
#include "framework.h"
#include "GameCoding.h"
#include "Game.h"

#define MAX_LOADSTRING 100

// Global Variables:
HINSTANCE hInst;                                // current instance
HWND hWnd;


// Forward declarations of functions included in this code module:
ATOM                MyRegisterClass(HINSTANCE hInstance);
BOOL                InitInstance(HINSTANCE, int);
LRESULT CALLBACK    WndProc(HWND, UINT, WPARAM, LPARAM);

int APIENTRY wWinMain(_In_ HINSTANCE hInstance,
                     _In_opt_ HINSTANCE hPrevInstance,
                     _In_ LPWSTR    lpCmdLine,
                     _In_ int       nCmdShow)
{
    // 1) 윈도우 창 정보 등록
    MyRegisterClass(hInstance);

    // 2) 윈도우 창 생성
    if (!InitInstance (hInstance, nCmdShow))
        return FALSE;

    Game game;
    game.Init(hWnd);

    MSG msg = {};

    // Main message loop:
    while (msg.message != WM_QUIT)
    {
        if (::PeekMessage(&msg, NULL, 0, 0, PM_REMOVE))
        {
            TranslateMessage(&msg);
            DispatchMessage(&msg);
        }
        else
        {
            game.Update();
            game.Render();
        }
    }

    return (int) msg.wParam;
}

//
//  FUNCTION: MyRegisterClass()
//
//  PURPOSE: Registers the window class.
//
ATOM MyRegisterClass(HINSTANCE hInstance)
{
    WNDCLASSEXW wcex;

    wcex.cbSize = sizeof(WNDCLASSEX);

    wcex.style          = CS_HREDRAW | CS_VREDRAW;
    wcex.lpfnWndProc    = WndProc;
    wcex.cbClsExtra     = 0;
    wcex.cbWndExtra     = 0;
    wcex.hInstance      = hInstance;
    wcex.hIcon          = LoadIcon(hInstance, MAKEINTRESOURCE(IDI_GAMECODING));
    wcex.hCursor        = LoadCursor(nullptr, IDC_ARROW);
    wcex.hbrBackground  = (HBRUSH)(COLOR_WINDOW+1);
    wcex.lpszMenuName = NULL;
    wcex.lpszClassName  = L"GameCoding";
    wcex.hIconSm        = LoadIcon(wcex.hInstance, MAKEINTRESOURCE(IDI_SMALL));

    return RegisterClassExW(&wcex);
}

//
//   FUNCTION: InitInstance(HINSTANCE, int)
//
//   PURPOSE: Saves instance handle and creates main window
//
//   COMMENTS:
//
//        In this function, we save the instance handle in a global variable and
//        create and display the main program window.
//
BOOL InitInstance(HINSTANCE hInstance, int nCmdShow)
{
   hInst = hInstance; // Store instance handle in our global variable

   RECT windowRect = { 0, 0, GWinSizeX, GWinSizeY };
   ::AdjustWindowRect(&windowRect, WS_OVERLAPPEDWINDOW, false);

   hWnd = CreateWindowW(L"GameCoding", L"Client", WS_OVERLAPPEDWINDOW,
      CW_USEDEFAULT, 0, windowRect.right - windowRect.left, windowRect.bottom - windowRect.top, nullptr, nullptr, hInstance, nullptr);

   if (!hWnd)
   {
      return FALSE;
   }

   ::ShowWindow(hWnd, nCmdShow);
   ::UpdateWindow(hWnd);

   return TRUE;
}

//
//  FUNCTION: WndProc(HWND, UINT, WPARAM, LPARAM)
//
//  PURPOSE: Processes messages for the main window.
//
//  WM_COMMAND  - process the application menu
//  WM_PAINT    - Paint the main window
//  WM_DESTROY  - post a quit message and return
//
//
LRESULT CALLBACK WndProc(HWND hWnd, UINT message, WPARAM wParam, LPARAM lParam)
{
    switch (message)
    {
    case WM_COMMAND:
        {
            int wmId = LOWORD(wParam);
            // Parse the menu selections:
            switch (wmId)
            {
            case IDM_EXIT:
                DestroyWindow(hWnd);
                break;
            default:
                return DefWindowProc(hWnd, message, wParam, lParam);
            }
        }
        break;
    case WM_PAINT:
        {
            PAINTSTRUCT ps;
            HDC hdc = BeginPaint(hWnd, &ps);
            // TODO: Add any drawing code that uses hdc here...
            EndPaint(hWnd, &ps);
        }
        break;
    case WM_DESTROY:
        PostQuitMessage(0);
        break;
    default:
        return DefWindowProc(hWnd, message, wParam, lParam);
    }
    return 0;
}
이렇게 Window API 부분을 작업을 해줬다.
여기까지 해줬으면 이제 Game 클래스에서만 작업을 해주면 된다.
#pragma once
class Game
{
public:
	Game();
	~Game();

public:
	void Init(HWND hwnd);
	void Update();
	void Render();

private:
	HWND _hwnd;
	uint32 _width = 0;
	uint32 _height = 0;

private:
	// DX
};
// Game.cpp
#include "pch.h"
#include "Game.h"

Game::Game()
{
}

Game::~Game()
{
}

void Game::Init(HWND hwnd)
{
	_hwnd = hwnd;
	_width = GWinSizeX;
	_height = GWinSizeY;

	// TODO
}

void Game::Update()
{
}

void Game::Render()
{
}
원래는 WinApi에서 HDC라는 것을 뽑아서 거기에 렌더를 했는데, 그것과 다른 점은 렌더링 하는 라이브러리를 DX11로 교체할 것이라는 것이다.
여기까지 워밍업 이었고, 이제 어떻게 GPU에게 명령을 내릴 수 있을지 알아볼 것이다.
삼각형 하나를 띄우기 위해서도 렌더링 파이프라인을 거쳐야 한다.
참고:
`.lib`, `.h`, `.inl` 파일들은 C++ 프로그래밍 및 개발에서 사용되는 다른 유형의 파일들로, 각각 다른 목적과 역할을 가지고 있습니다:
1. .lib 파일:
- 용도: `.lib` 파일은 라이브러리 파일로, 함수, 클래스, 객체 등을 포함하고 있습니다. 이러한 라이브러리는 정적 라이브러리(Static Libraries)와 동적 라이브러리(Dynamic Libraries)의 두 종류가 있으며, `.lib` 파일은 주로 정적 라이브러리를 지칭합니다.
- 역할: 프로그램이 컴파일될 때, `.lib` 파일 안에 있는 코드가 최종 실행 파일(exe)에 포함됩니다. 즉, 프로그램 실행에 필요한 코드가 프로그램과 함께 배포되어, 별도의 공유 라이브러리 파일 없이 실행될 수 있게 합니다.
2. .h 파일:
- 용도: `.h` 파일은 헤더 파일로, C++에서 함수, 클래스, 타입 정의, 매크로 정의, 전역 변수 등을 선언하는 데 사용됩니다.
- 역할: 헤더 파일은 코드의 재사용성을 높이고, 모듈화를 도와줍니다. 다른 소스 파일(.cpp)에서 `#include` 지시어를 사용하여 헤더 파일을 포함시킴으로써, 해당 헤더 파일에 정의된 함수, 클래스 등을 사용할 수 있습니다.
3. .inl 파일:
- 용도: `.inl` 파일은 인라인(inline) 파일로, 주로 헤더 파일과 같이 사용되며, 클래스나 함수의 인라인 정의를 포함하기 위해 사용됩니다.
- 역할: 인라인 파일은 성능 최적화를 위해 사용되며, 주로 헤더 파일 내에서 선언된 인라인 함수의 본문을 정의하는 데 사용됩니다. 이렇게 분리함으로써 코드의 가독성과 관리가 용이해지며, 컴파일러 최적화에도 도움이 됩니다.
이 세 종류의 파일들은 C++ 프로젝트의 다양한 측면에서 중요한 역할을 하며, 각각의 파일은 코드의 재사용, 모듈화, 성능 최적화 등에 기여합니다.
'DirectX' 카테고리의 다른 글
| 5. 텍스쳐와 UV (0) | 2023.12.13 |
|---|---|
| 4. 삼각형 띄우기 (0) | 2023.12.09 |
| 3. 장치 초기화 (0) | 2023.12.06 |
| 1. 렌더링 OT (0) | 2023.12.01 |
| 0. DirectX OT 및 계획 (0) | 2023.12.01 |

댓글