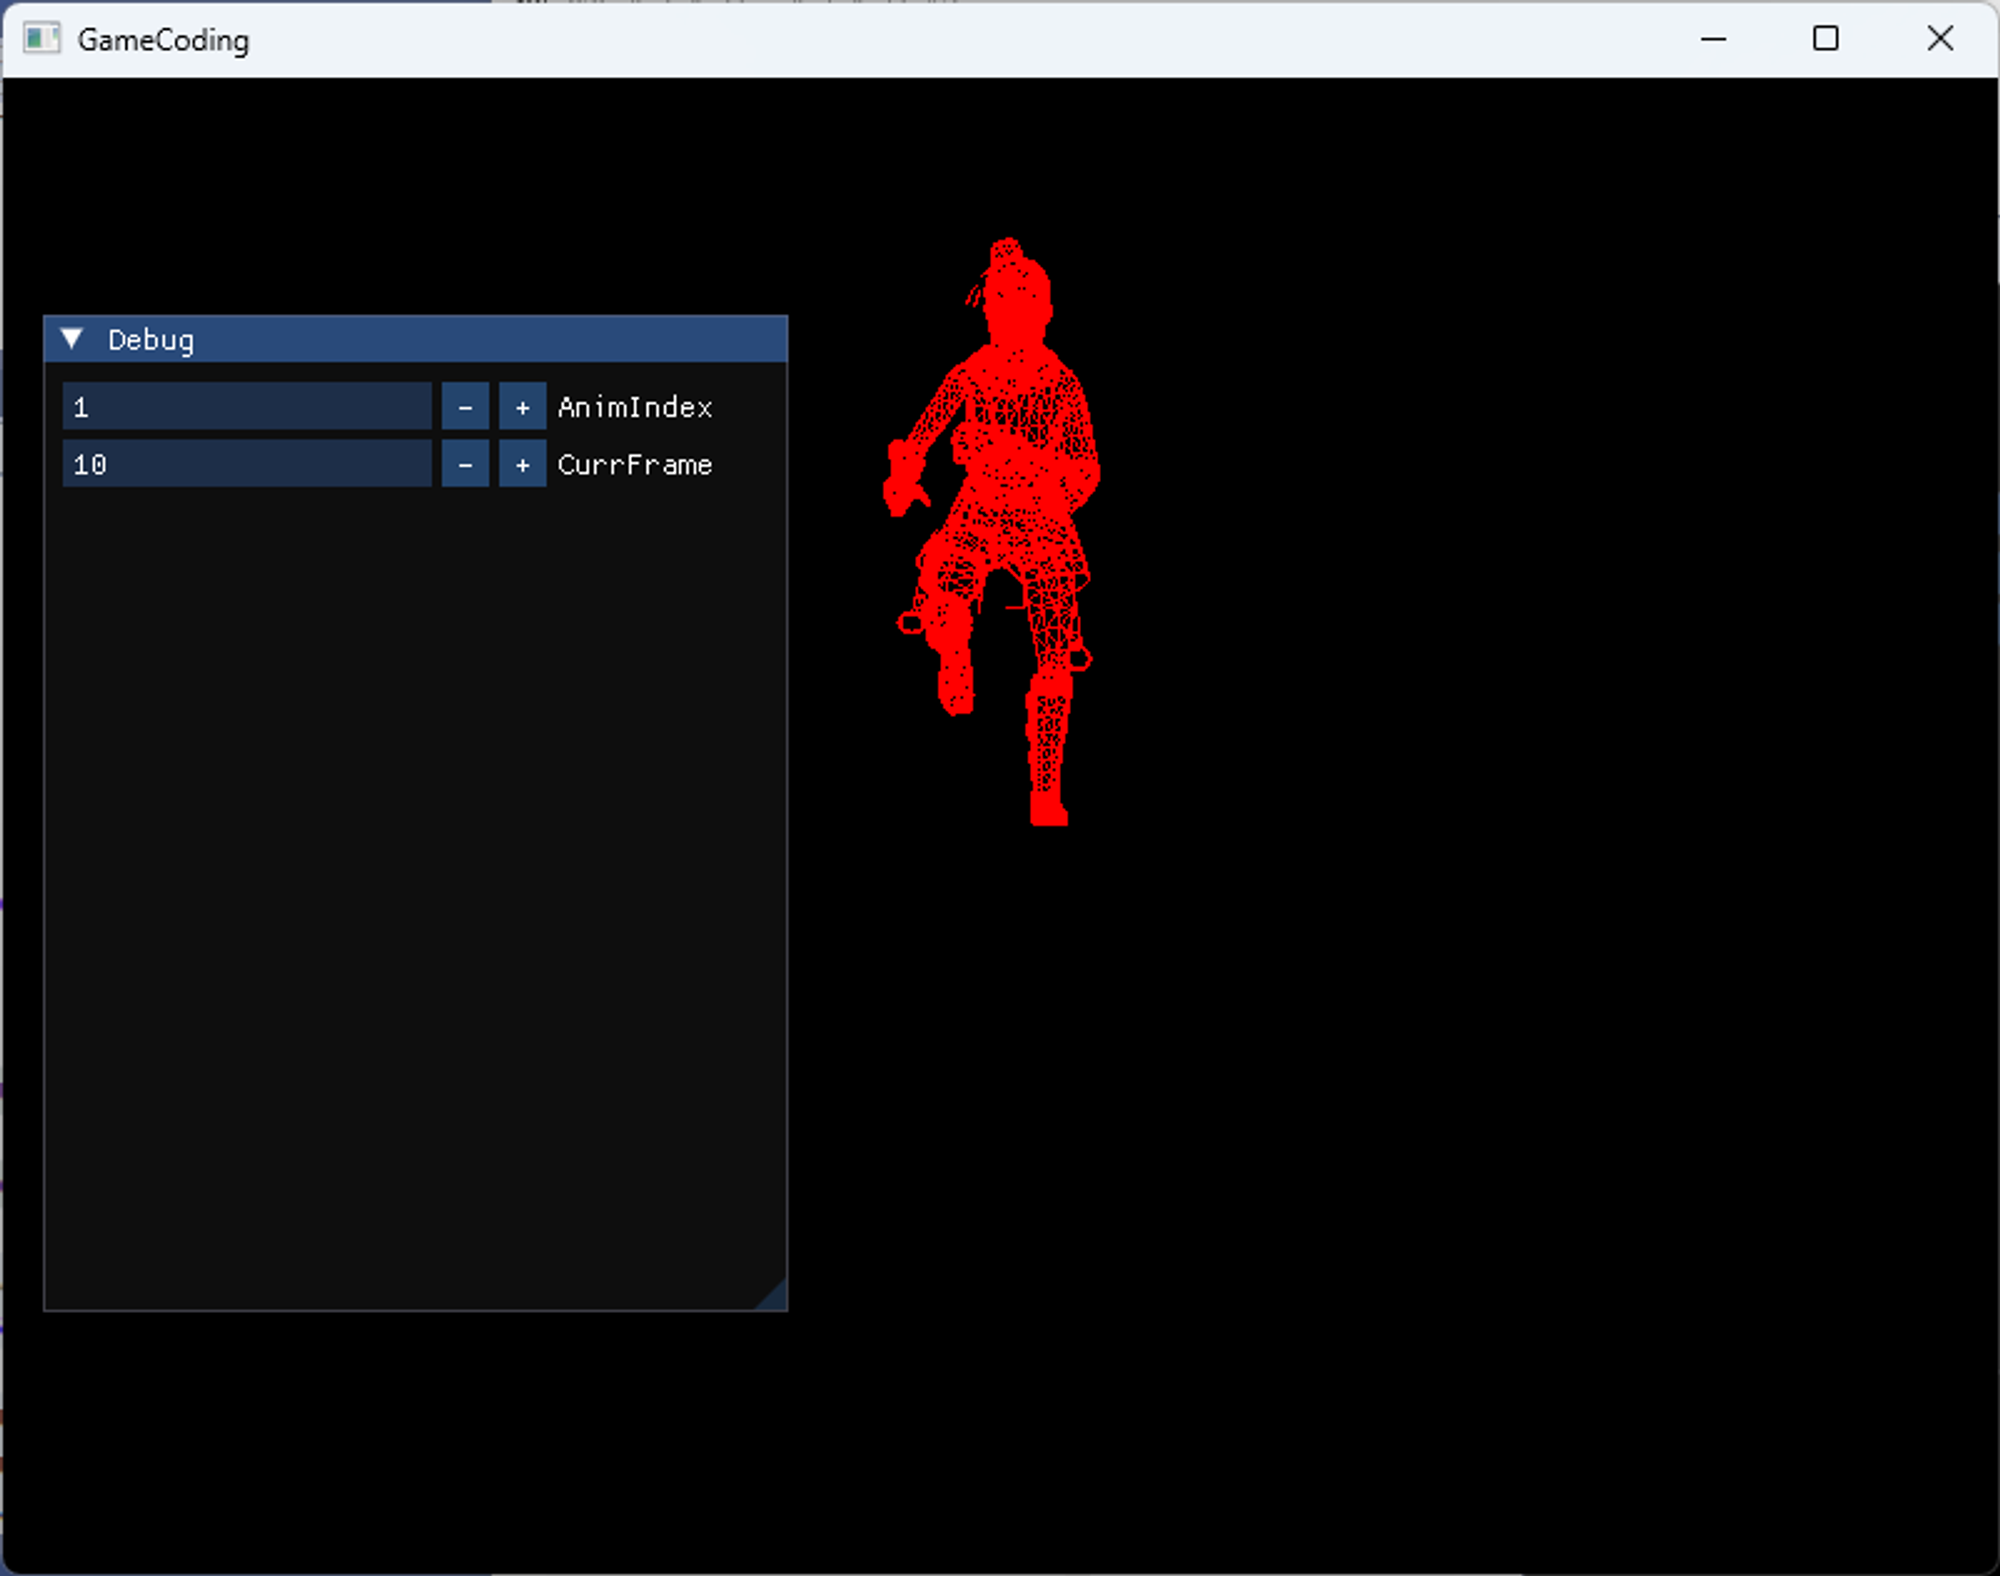
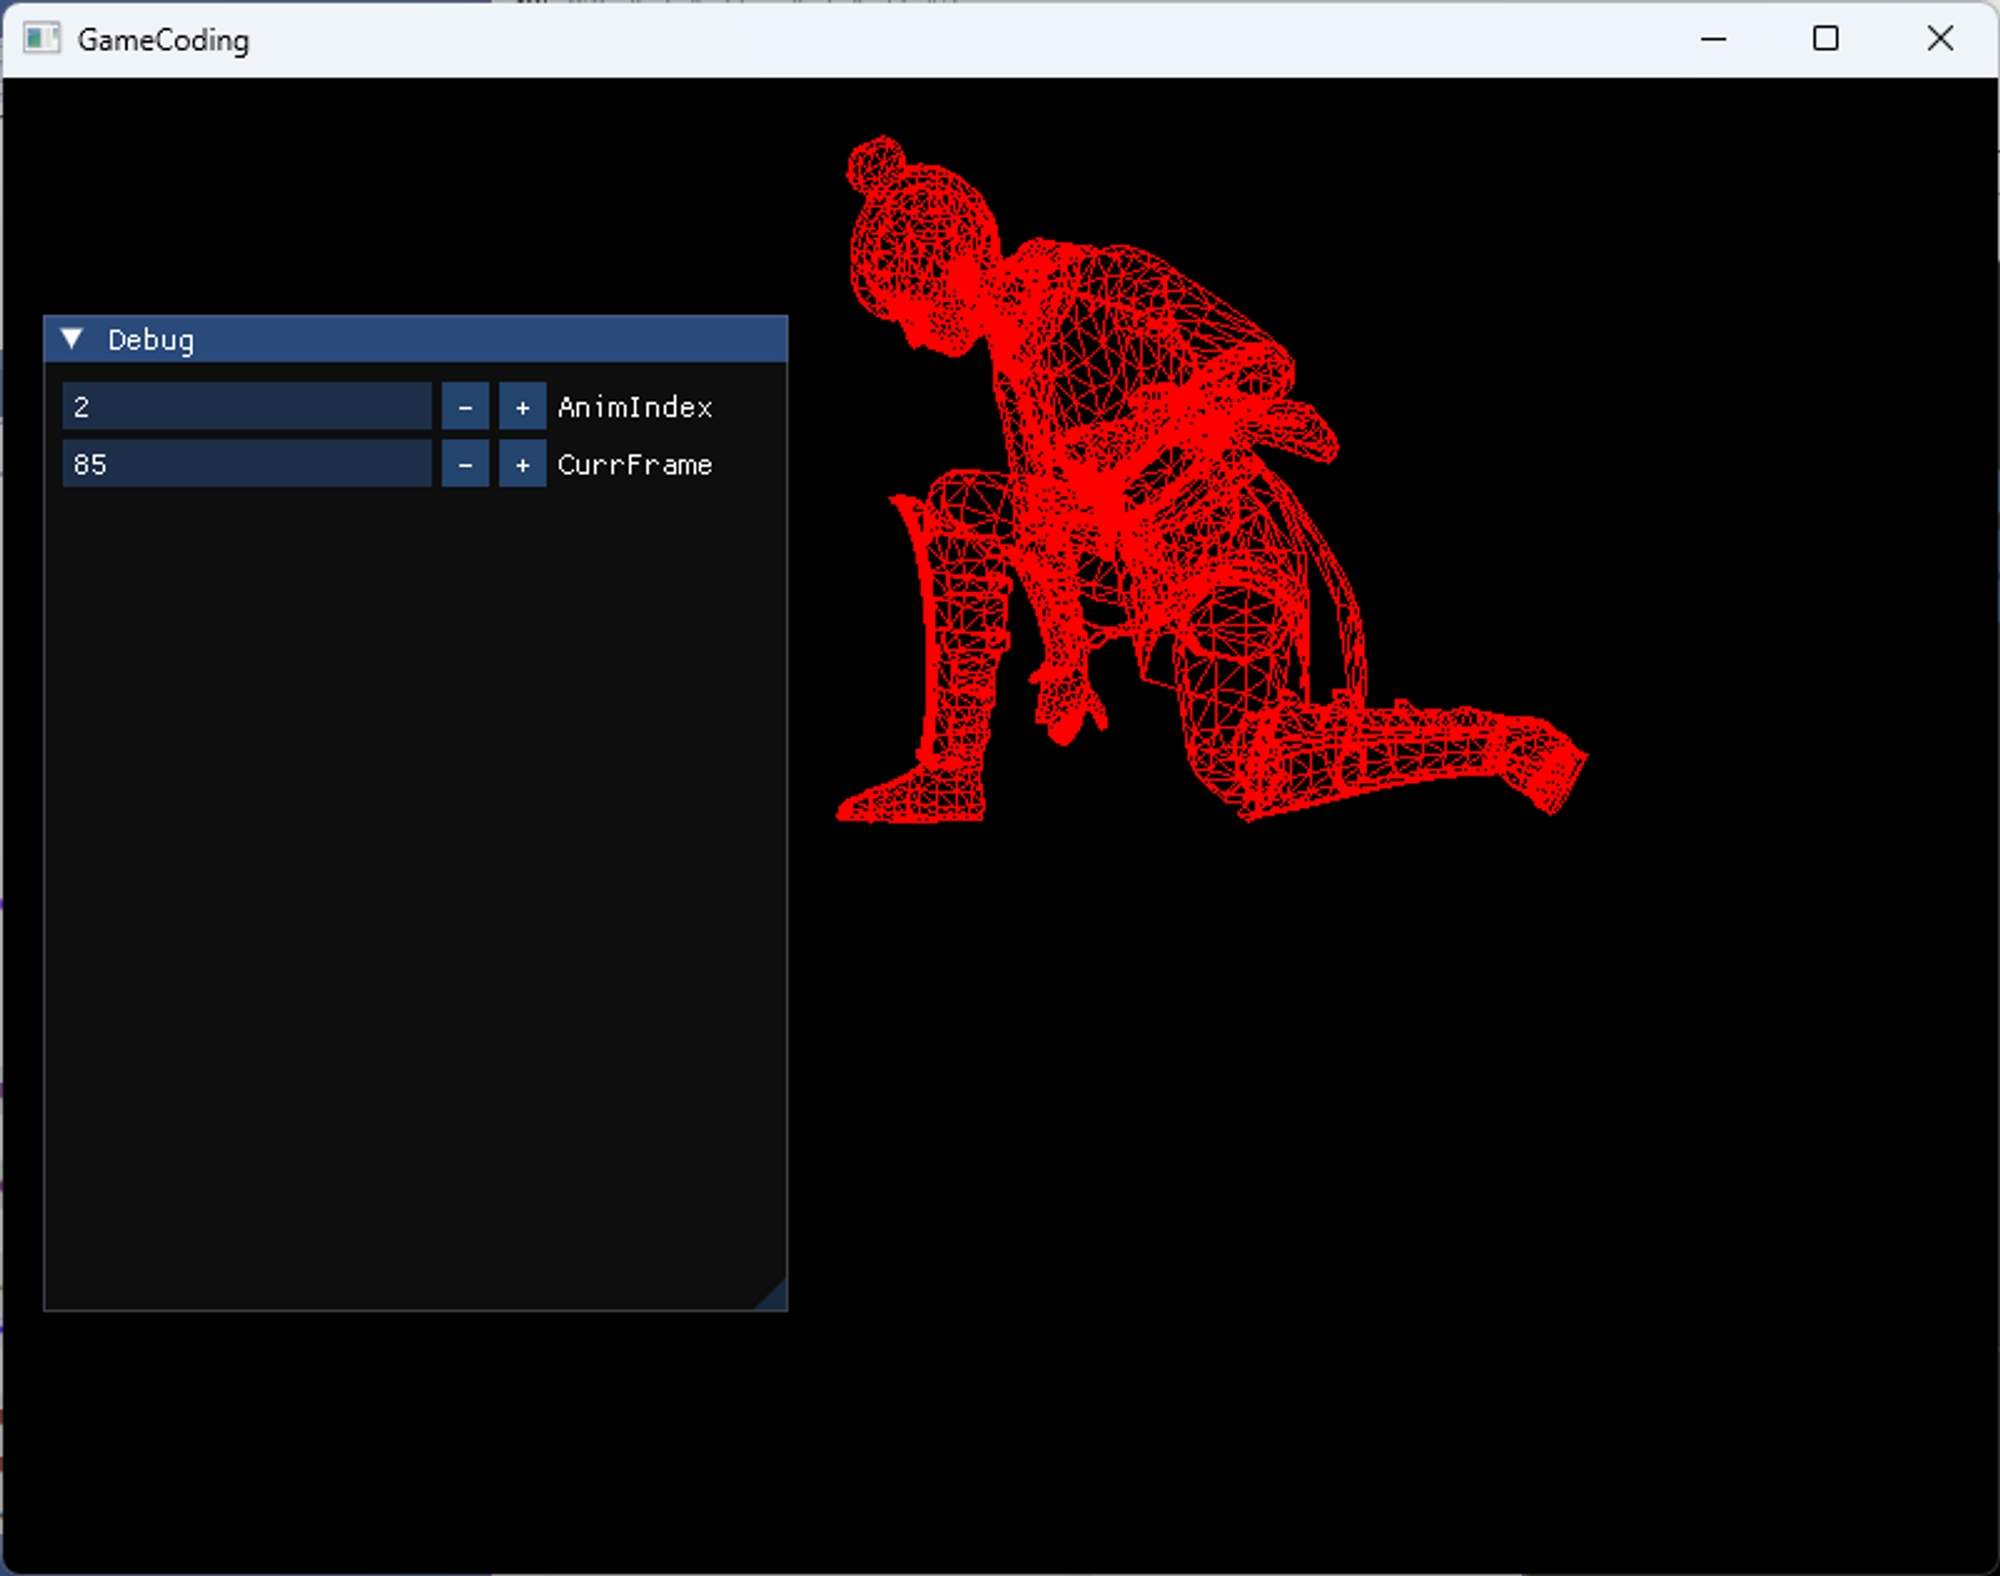
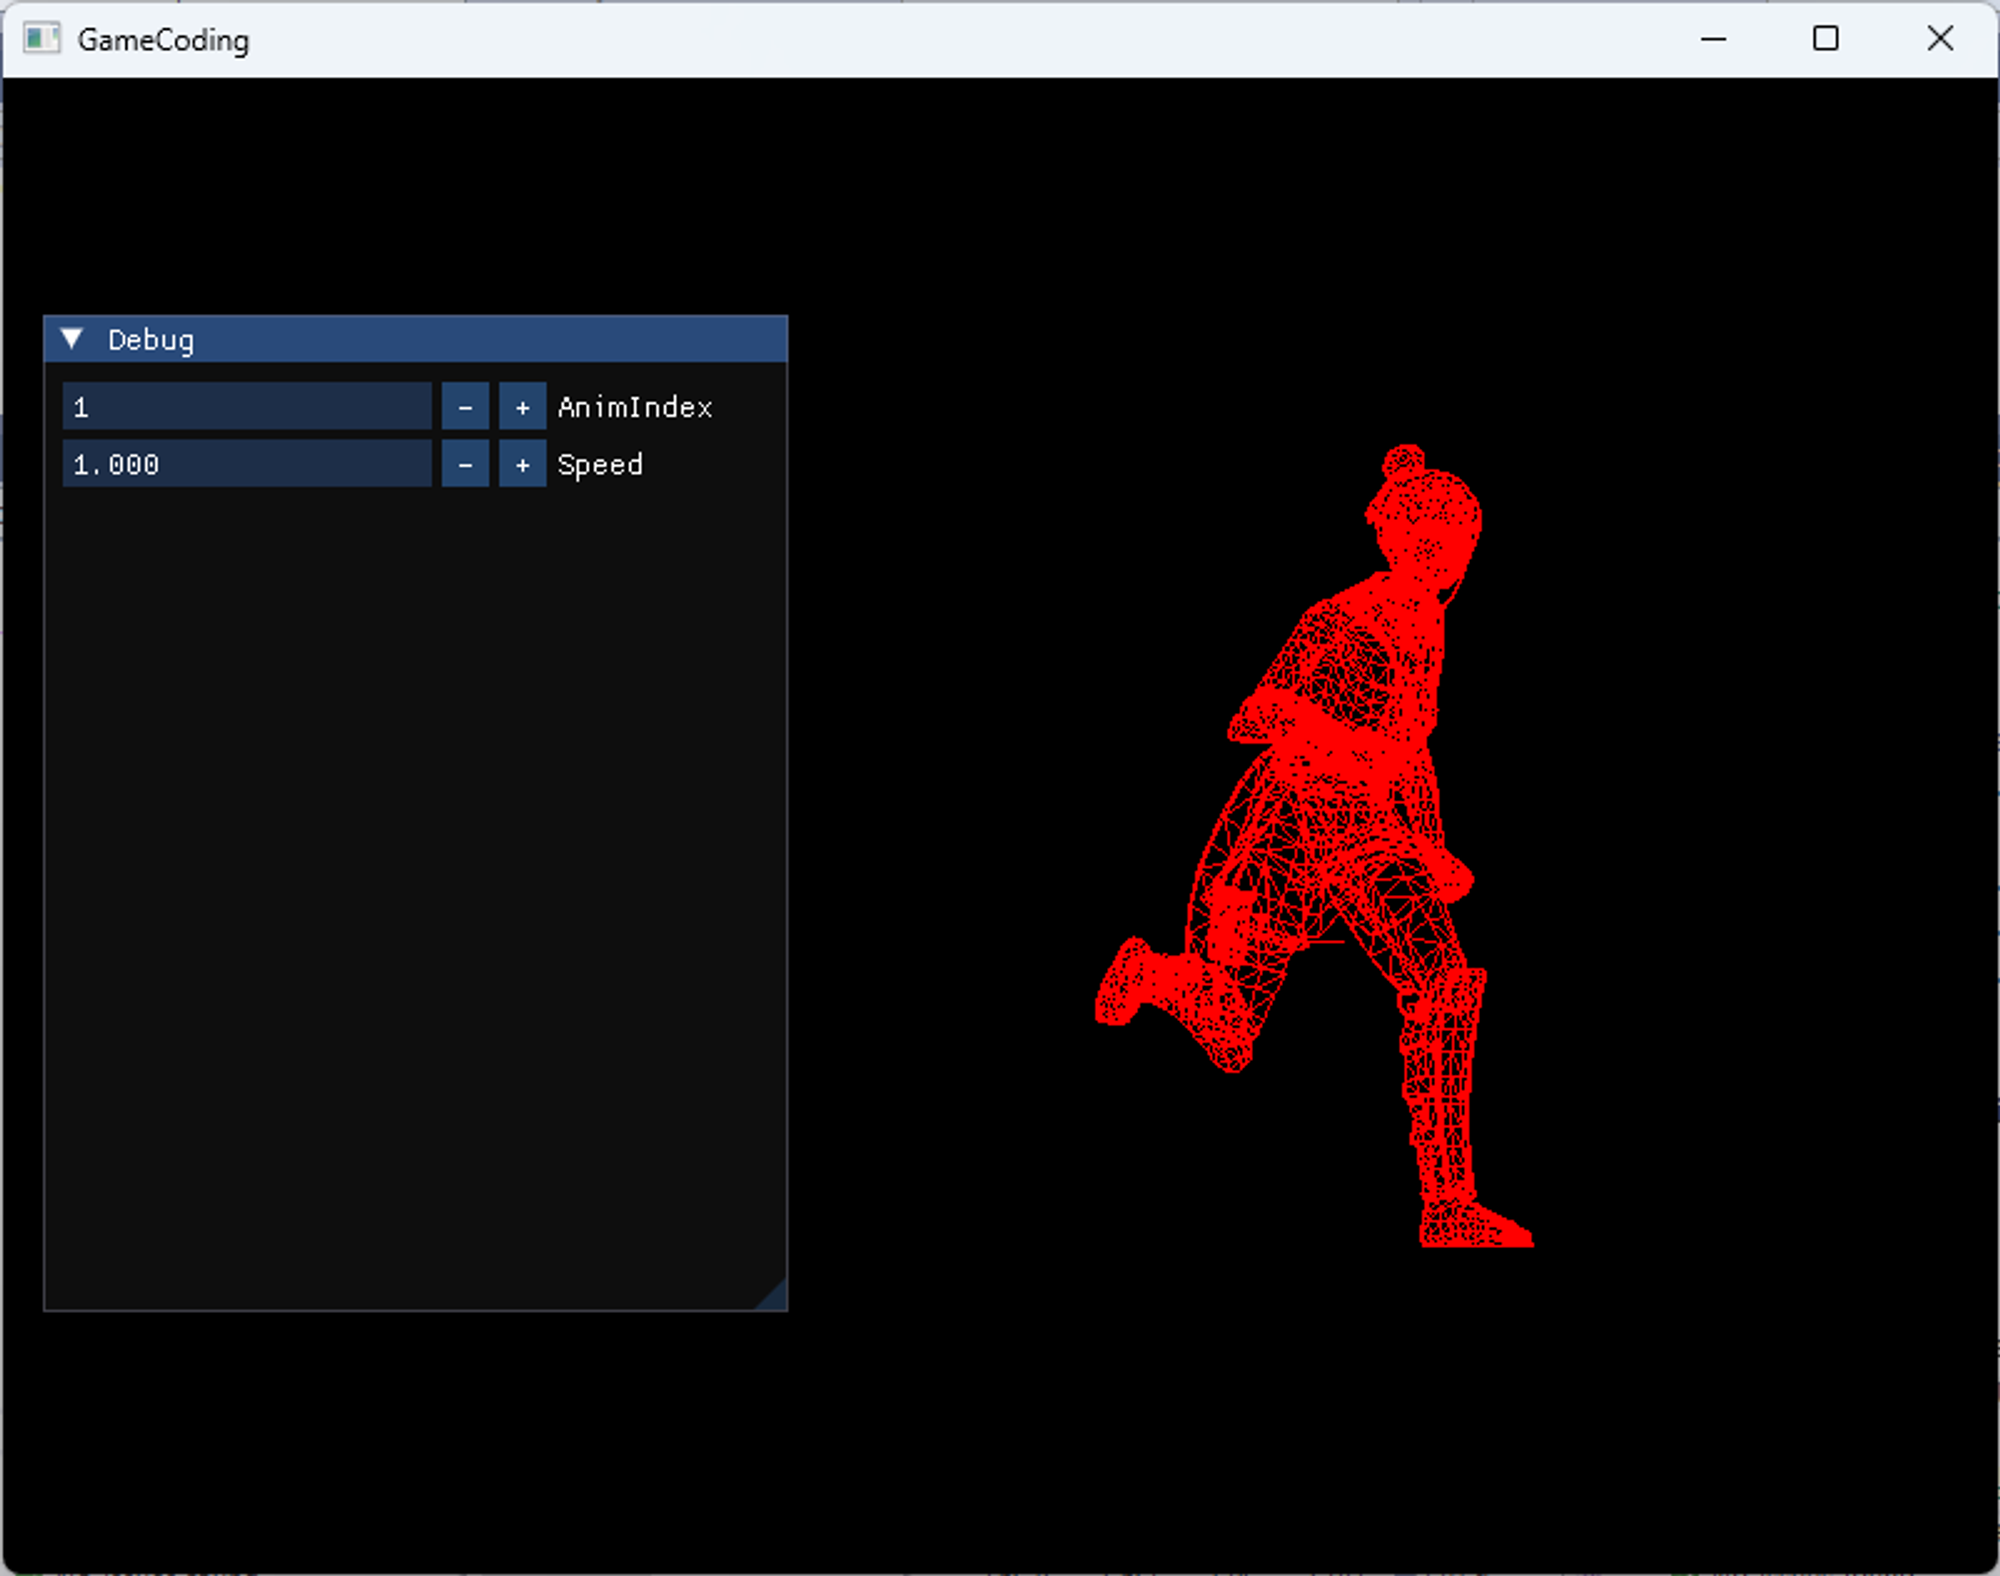
이제 Shader 작업을 한다.
16. AnimationDemo.fx에서 작업을 해본다.
일단 여기에 다 넣어주고 나중에 Common 필터 쪽에다가 정리하보도록 한다.
그 전에 하나 빼먹은게 있다.
1. Animation 정보를 Shader에 전달하는 함수 RenderManager::PushKeyframeData정의하기
1) 무슨 Animation을 재생한다는 정보를 Shader에 건내기 위해 필요한 정보를 저장할 struct KeyframeDesc를 정의하기
ModelAnimator에서 무슨 Animation을 틀어주고 있다라는 걸 건내기 위해 추가적인 정보가 필요하다.
얼마 시간이 경과가 되었고, 무엇을 하고 있고, 이런 관련된 정보가 있어야 한다.
지금까지는 RenderManager에서 관련된 정보를 넣고 있었다. 여기에 추가적으로 애니메이션과 관련된 부분이 추가가 된다.
struct KeyframeDesc라고 부를 것이다.
RenderManager.h에
// Animation
struct KeyframeDesc
{
	int32 animIndex = 0; // 현재 실행되는 애니메이션 번호
	uint32 currFrame = 0;
	//TODO
	uint32 nextFrame = 0;
	float ratio = 0.f;
	float sumTime = 0.f;
	float speed = 1.f;
	Vec2 padding;
};
이렇게 넣어주는데 일단은 animIndex, currFrame 이 두 개만 사용할 것이다.
//TODO 아래 있는 부분은 나중에 사용할 일이 생길 것이다.
2) KeyframeDesc를 버퍼에 담아 Shader에 밀어 넣는 PushKeyframeData함수 선언하기
KeyframeDesc를 매개변수로 하는 PushKeyframeData 함수를 만든다.
void PushKeyframeData(const KeyframeDesc& desc);
3) _KeyframeDesc, _keyframeBuffer, _keyframeEffectBuffer 변수 선언하기
RenderManager.h에
	KeyframeDesc _keyframeDesc;
	shared_ptr<ConstantBuffer<KeyframeDesc>> _keyframeBuffer;
	ComPtr<ID3DX11EffectConstantBuffer> _keyframeEffectBuffer;
현재 애니메이션의 상태를 GPU에 전달하는데 필요한 변수들을 선언한다.
RenderManager에서 모든걸 넣어주면 언젠가 분리를 해야한다. 쉐이더가 바뀔 때마다 이게 사실상 바뀌는 것이기 때문에 지금은 간단히 하기 위해 여기에 넣어주고 있지만 정리 정돈이 되고 기능이 다 익혀지게 되면 한번 더 정리를 할 필요가 있다.
4) RenderManager::Init에서 _keyframeBuffer를 초기화 하고, _keyframeEffectBuffer를 shader의 변수와 연결하기
RenderManager::Init에서
	_keyframeBuffer = make_shared<ConstantBuffer<KeyframeDesc>>();
	_keyframeBuffer->Create();
	_keyframeEffectBuffer = _shader->GetConstantBuffer("KeyframeBuffer");
이 코드를 넣어줘서 Buffer를 만들고 쉐이더의 cbuffer KeyframeBuffer와 _keyframeEffectBuffer를 연결한다.
5) _keyframeDesc를 버퍼에 넣고, shader에 전달하는 PushKeyframeData 함수 정의하기
void RenderManager::PushKeyframeData(const KeyframeDesc& desc)
{
	_keyframeDesc = desc;
	_keyframeBuffer->CopyData(_keyframeDesc);
	_keyframeEffectBuffer->SetConstantBuffer(_keyframeBuffer->GetComPtr().Get());
}
애니메이션에 관한 정보를 연결한 cbuffer KeyframeBuffer에 밀어넣는 PushKeyframeData 함수를 정의한다.
_keyframeDesc에 들어있는 animIndex와 currFrame을 넣어주면은 그걸 Shader 쪽에서 받아서 사용할 것이다.
2. Shader에 애니메이션 정보를 받는데 필요한 구조체와 변수 선언하기
1) shader가 애니메이션 정보를 받을 수 있게 RenderManager와 대칭적으로 struct KeyframeDesc와 cbuffer KeyframeBuffer 정의하기
16. AnimationDemo.fx에서도 대칭성이 있는 것인데
관련된 Shader를 똑같이 만들어 주면 된다.
#define MAX_MODEL_TRANSFORMS 250
#define MAX_MODEL_KEYFRAMES 500

struct KeyframeDesc
{
    int animIndex;
    uint currFrame;
    uint nextFrame;
    float ratio;
    float sumTime;
    float speed;
    float2 padding;
};

cbuffer KeyframeBuffer
{
    KeyframeDesc Keyframes;
};
cbuffer의 이름은 RenderManager::Init에서의
_keyframeEffectBuffer = _shader->GetConstantBuffer("KeyframeBuffer");
KeyframeBuffer과 똑같이 맞춰주면 된다.
2) shader가 ModelAnimator::CreateTexture에서 만들어 srv로 넘겨줄 Texture2DArray을 받을 수 있게 변수 선언하기
16. AnimationDemo.fx 에
Texture2DArray TransformMap;
이걸 선언한다.
이게 SRV로 떠 넘겨줄 그 Texture2D의 Array이다. ModelAnimator::CreateTexture에서 힘들게 만들어준 아이가 있었다. 이 부분을 여기에 꽂아줄 예정이라고 보면 된다.
uint BoneIndex;
Texture2DArray TransformMap;
이 부분을 연결하는 부분부터 본다.
3. 테스트를 위해 ImGui세팅하기
ModelAnimator::Update에서
지금 가장 간단하게 테스트할 수 있는 방법은 ImGui 이용해서 수동으로 버튼 눌러서 애니메이션 다음 거로 넘어가고 이렇게 설정하면 될 것이기 때문에 그걸 편리하게 하기 위해서 ImGui 관련된 코드를 넣어준다.
void ModelAnimator::Update()
{
	if (_model == nullptr)
		return;

	// TODO
	if (_texture == nullptr)
		CreateTexture();

	// Anim Update
	ImGui::InputInt("AnimIndex", &_keyframeDesc.animIndex);
	_keyframeDesc.animIndex %= _model->GetAnimationCount();
	ImGui::InputInt("CurrFrame", (int*)&_keyframeDesc.currFrame);
	_keyframeDesc.currFrame %= _model->GetAnimationByIndex(_keyframeDesc.animIndex)->frameCount;
4. ModelAnimator::Update()에서 shader의 cbuffer KeyframeBuffer와 Texture2DArray TransformMap에 데이터 전달하기
그리고 ModelAnimator.h에 키프레임 관련 정보를 담을 변수를 추가한다.
private:
	KeyframeDesc _keyframeDesc;
KeyframeDesc안의 animIndex는 현재 애니메이션이고, currentFrame은 현재 애니메이션 내에서 내가 실행하고 있는 프레임인데 지금은 초기값 0이겠지만 수동으로 버튼을 눌러서 조작을 하면 얘네들이 늘어나게 될 것이다.
ModelAnimator::Update()에서
	// 애니메이션 현재 프레임 정보
	RENDER->PushKeyframeData(_keyframeDesc);
여기에서 shader에 _keyframeDesc를 전달해 주면 된다.
	// SRV를 통해 정보 전달
	_shader->GetSRV("TransformMap")->SetResource(_srv.Get());
마지막으로 SRV를 통해 Shader의 Texture2DArray TransformMap; 로 정보를 전달한다.
일단은 아직 Shader 코드는 완성되지 않았지만 이런 온갖 잡동사니들을 이용해서 Shader에 데이터를 연결하는 부분까지는 뭔가가 들어가긴 했다.
남은 건 Shader 코드를 작성해서 뭔가 처리하게끔 만들어 줘야 한다.
5. ImGui 적용 테스트 하기
실행을 해보면

이렇게 버튼을 눌러서 값을 조절할 수 있게 되었다.
애니메이션을 바꿀 때 클릭을 통해 바꿀 수 있게 되었다
	// Anim Update
	ImGui::InputInt("AnimIndex", &_keyframeDesc.animIndex);
	_keyframeDesc.animIndex %= _model->GetAnimationCount();
	ImGui::InputInt("CurrFrame", (int*)&_keyframeDesc.currFrame);
	_keyframeDesc.currFrame %= _model->GetAnimationByIndex(_keyframeDesc.animIndex)->frameCount;
여기서 나머지 연산을 넣어준 이유는
덧셈을 하다가 말도 안되는 값이 되면 overflow를 일으킬 수 있기 때문이다.
// Anim Update
ImGui::InputInt("AnimIndex", &_keyframeDesc.animIndex);
_keyframeDesc.animIndex %= _model->GetAnimationCount();
ImGui::InputInt("CurrFrame", (int*)&_keyframeDesc.currFrame);
_keyframeDesc.currFrame %= _model->GetAnimationByIndex(_keyframeDesc.animIndex)->frameCount;

// 애니메이션 현재 프레임 정보
RENDER->PushKeyframeData(_keyframeDesc);

// SRV를 통해 정보 전달
_shader->GetSRV("TransformMap")->SetResource(_srv.Get());
이렇게 해서 일단은 shader에 데이터가 들어가긴 했으니까
남은 코드는 16. AniationDemo.fx의 VS의 //TODO에 무엇인가를 작성을 해서
현재 애니메이션에서 원하는 것을 뽑아서 적용이 되게끔 만들어주는 함수를 16. AniationDemo.fx 여기에서 작업을 해주면 된다.
6. shader에서 GetAnimationMatrix함수 정의하기
우리가 작업하고 있던 기본 포즈가 아니라 애니메이션의 최종 포지션으로 옮기는게 목적이다.
matrix GetAnimationWorldMatrix(VertexTextureNormalTangentBlend input)
이 함수를 통해 얻은 matrix를 이용해서 연산을 이어가게끔 만들어주면 된다.
MeshOutput VS(VertexTextureNormalTangentBlend input)
{
    MeshOutput output;

    // TODO
    output.position = mul(input.position, BoneTransforms[BoneIndex]);
    output.position = mul(output.position, W);
    output.worldPosition = output.position.xyz;
    output.position = mul(output.position, VP);
    output.uv = input.uv;
    output.normal = mul(input.normal, (float3x3)W);
    output.tangent = mul(input.tangent, (float3x3)W);

    return output;
}
에서 BonTransforms[BoneIndex]를 곱해주는 거는 이제 필요 없으니 삭제하고,
원래 W로 바로 곱했었는데
이제는 현재 T포즈에서 기반으로 되어 있던 좌표가 들어가게 될텐데 그거를 다시 로컬로 내렸다가 다시 글로벌로 올리는 작업을 해주게 될 것이다.
그 연산을 matrix GetAnimationWorldMatrix(VertexTextureNormalTangentBlend input) 여기에서 해줄 것이다.
이해하기 어려울 수 있다.
우리가 구한 애니메이션에 관한 정보가 매개변수로 전달받은 VertexTextureNormalTangentBlend input에 들어가 있다.
struct VertexTextureNormalTangentBlend
{
    float4 position : POSITION;
    float2 uv : TEXCOORD;
    float3 normal : NORMAL;
    float3 tangent : TANGENT;
    float4 blendIndices : BLEND_INDICES;
    float4 blendWeights : BLEND_WEIGHTS;
};
blendIndices , blendWeights 에 xyzw 값에 원하는 정보가 들어가 있다.
여기 있는 정보는 정점마다 나랑 연관성이 있는 뼈와 영향을 받는 비율을 기입을 한 것이다.
그게 xyzw에 들어가 있으면 코드를 만들기 힘드니까 1차적으로 빼주도록 한다.
matrix GetAnimationWorldMatrix(VertexTextureNormalTangentBlend input)
{
    float indices[4] = { input.blendIndices.x, input.blendIndices.y, input.blendIndices.z, input.blendIndices.w };
    float weights[4] = { input.blendWeights.x, input.blendWeights.y, input.blendWeights.z, input.blendWeights.w };

}
cbuffer KeyframeBuffer의 Keyframes에서 현재 값을 추출한다.
int animIndex = Keyframes.animIndex;
int currFrame = Keyframes.currFrame;
이제 남은 건 최대 4개를 하나씩 순회를 하면서 관련된 정보를 추출하면 되는데
현재 뼈, 현재 애니메이션, 현재 프레임이라는 3가지 정보가 있을 때
그 정보에 해당하는 변환 행렬을 어디서 얻을 수 있었을까?
Texture2DArray TransformMap;
이다.
여기서 정보를 추출해서 꺼내서 연산을 만들어 주면 되겠다는 결론을 내릴 수 있다.
    float4 c0, c1, c2, c3;
    matrix curr = 0;
    matrix transform = 0;

    for (int i = 0; i < 4; i++)
    {
        c0 = TransformMap.Load(int4(indices[i] * 4 + 0, currFrame, animIndex, 0));
        c1 = TransformMap.Load(int4(indices[i] * 4 + 1, currFrame, animIndex, 0));
        c2 = TransformMap.Load(int4(indices[i] * 4 + 2, currFrame, animIndex, 0));
        c3 = TransformMap.Load(int4(indices[i] * 4 + 3, currFrame, animIndex, 0));

        curr = matrix(c0, c1, c2, c3);
        transform += mul(weights[i], curr);
    }
}
여기서 질문 중 하나가
ModelAnimator::CreateTexture에서
desc.Width = MAX_MODEL_TRANSFORMS * 4;
여기서 왜 4를 곱했는지 간략하게 설명한 적이 있다.
desc.Format = DXGI_FORMAT_R32G32B32A32_FLOAT; // 16바이트
이미지에 넣어줄 수 있는 최대 크기가 16바이트 밖에 안되는데 넣어줘야 하는 데이터가 64바이트 즉 하나의 행렬을 넣어주고 싶은 것이기 때문에 4칸을 쪼개서 그 정보를 취합해서 하나의 행렬을 만들어 주겠다고 결의를 했기 때문에 그래서 코드가 이렇게 들어가 있는 부분이라고 볼 수 있다.

indices[i] 뼈 번호에 몇 번째에 접근하면 되는지가 이렇게 되어 있는 것이다.
뼈 번호 몇 번째 번호인지에 따라가지고 정해지는데 칸을 4칸으로 쪼개서 4배로 관리하고 있기 때문에 4칸씩 건너뛰어야 한다는 얘기가 된다.
그러기 때문에 *4가 들어가게 된 것이고, +0,1,2,3 정보를 취합한 다음에
16바이트 정보를 긁어서 모아서 하나의 행렬로 curr에 만들어 주면 된다
만들어진 행렬은 animIndex와 currFrame과 현재 뼈대(indices[i])라는 세가지 정보를 알았을 때의 matrix를 curr에 구해주게 된 것이고, 그 matrix를 바로 사용하는게 아니라
transform += mul(weights[i], curr);
가중치에다가 곱해서 더해주고 있는 것이다.
가중치를 4번씩 구해서 더하는 이유는 사실상 어떠한 정점이 무조건 하나의 뼈에 영향을 받는게 아니라 여러개의 관절에 영향을 받기 때문이다. 예를 들면 어깨라고 하면 어깨 관절에 붙어 있을 것이다. 그런 여러가지의 관절에 영향을 받는다는 규칙이 정해져 있었기 때문에 그 부분들을 적용하기 위해서 4번씩 이렇게 가중치에 따라 곱해지는 것이다. 일종의 비율을 정해서 곱해줘서 4번 돌아서 최종 완성이 되면 4개의 관절에 따라 적절한 비율로 보정이 되어서 중간값 어딘가로 딱 설정이 된다.
return transform;return transform 을 해줘도 되고
transform에다 world를 곱해가지고 world까지 가는 걸 한번에 구해줘도 될 것이고,
할 수 있으니 중의적인 이름으로 World를 빼고
함수의 이름을 matrix GetAnimationMatrix로 이름을 바꿔준다.
적절하게 원하는 걸 해주면 된다. 여기선 return transform;를 해주었다.
matrix GetAnimationMatrix(VertexTextureNormalTangentBlend input)
{
    float indices[4] = { input.blendIndices.x, input.blendIndices.y, input.blendIndices.z, input.blendIndices.w };
    float weights[4] = { input.blendWeights.x, input.blendWeights.y, input.blendWeights.z, input.blendWeights.w };

    int animIndex = Keyframes.animIndex;
    int currFrame = Keyframes.currFrame;

    float4 c0, c1, c2, c3;
    matrix curr = 0;
    matrix transform = 0;

    for (int i = 0; i < 4; i++)
    {
        c0 = TransformMap.Load(int4(indices[i] * 4 + 0, currFrame, animIndex, 0));
        c1 = TransformMap.Load(int4(indices[i] * 4 + 1, currFrame, animIndex, 0));
        c2 = TransformMap.Load(int4(indices[i] * 4 + 2, currFrame, animIndex, 0));
        c3 = TransformMap.Load(int4(indices[i] * 4 + 3, currFrame, animIndex, 0));

        curr = matrix(c0, c1, c2, c3);
        transform += mul(weights[i], curr);
    }

    return transform;
}
7. VS에서 GetAnimationMatrix를 호출해 얻은 matrix로 연산하기
중요한 건 이 GetAnimationMatrixf를 이용해가지고 처음에 시작을 하자마자
MeshOutput VS(VertexTextureNormalTangentBlend input)
{
    MeshOutput output;

    // TODO
    GetAnimationMatrix(input);
GetAnimationMaterix에 input을 넣으면 변환 행렬이 튀어나오니까 transform을 여기서 곱해주는 선 작업을 해주면 된다는 얘기가 된다.
이 부분만 선행이 되면 된다는 얘기다.
    // TODO
    matrix m = GetAnimationMatrix(input);
이 m이라는 건 어떤 입력을 넣어서
그 입력에 따라 가지고 원래 있던 T global에서 어떤 특정 local로 갔다가 그 bone에 해당하는 새로운 애니메이션의 global로 가는 행렬로 왔다 갔다 한거를 4번 해줘가지고 최종 변환 행렬이 이제 구해지게 된 거니까 m을 이용해서 뭔가 구해주면 된다.
output.position = mul(input.position, m);
을 해준 다음에 이어서 해주면 된다.
MeshOutput VS(VertexTextureNormalTangentBlend input)
{
    MeshOutput output;

    // TODO
    matrix m = GetAnimationMatrix(input);

    output.position = mul(input.position, m);
    output.position = mul(output.position, W);
    output.worldPosition = output.position.xyz;
    output.position = mul(output.position, VP);
    output.uv = input.uv;
    output.normal = mul(input.normal, (float3x3)W);
    output.tangent = mul(input.tangent, (float3x3)W);

    return output;
}
m을 곱해주게 되면 사실상 원래 있던 global 포지션에서 그걸 잠시 뼈대를 기준으로 하는 애로 내쳤다가 다시 애니메이션 변환을 한 새 global 포지션으로 맞춘 것이다.
한마디로 애니메이션의 변환에 따른 변환 행렬을 구해서 곱해 주게 되면 새로운 좌표로 변환이 되는 거고
그 좌표부터 순차적으로 원래했던 world, view, projection을 쭉 떄리면 된다.
8. 애니메이션 행렬 적용 테스트하기
결과를 살펴 보면

CurrFrame버튼을 누르고 있으면 움직이는 것을 볼 수 있다.
AnimIndex를 누르면 다른 애니메이션으로 바뀐다.


애니메이션 원리를 이해하는게 중요하다.
스키닝이라는 부분 부터 해서 모든 정점마다 나와 연관된 관절 번호가 매겨져 있고 그 번호에 따라가지고 우리가 적절히 섞어가지고 새로운 위치를 구해줬다는게 결론이다.
9. 보간해서 애니메이션을 부드럽게 만들어 주기
여기서 아쉬운 점은 애니메이션이 재생 되는건 다행이지만 뚝뚝 끊기는 느낌이 난다.
그건 CurrFrame을 옮길 때 마다 그 위치로 강제로 조정이 되기 때문이다.
부드럽게 처리하려면 어떻게 해야 할까?
보간을 해주면 된다.
현재 상태와 이전상태의 적절한 비율에 따라가지고 경과 시간에 따라 블렌딩을 해서 두가지 상태를 섞으면 훨씬 부드럽게 만들 수 있다는 얘기가 된다.
16. AnimationDemo.fx의 GetAnimationMatrix에
int nextFrame = Keyframes.nextFrame;
를 추가한다. 이 다음에 작업할 프레임을 말한다.
이걸 적절하게 조합하면 되지 않을까 하는 생각이 든다.
GetAnimationMatrix를 복붙하고 기존의 것은 주석처리를 한다.
복붙한 것에서 고쳐보기로 한다.
nextFrame에 따라서 보간하는 코드를 넣어야 의미가 있을 것이다.
그 부분이 갖춰져 있다는 가정 하에는 두 개를 섞는 것도 엄청 어렵지는 않다.
현재 애니메이션과 다음 애니메이션이 존재한다고 했을 때
float ratio = Keyframes.ratio;
추가적으로 이걸 받아 줄 것인데
이전 프레임과 현재 프레임에서 얼마만큼의 비율로 해야 되는지를 구해주도록 할 것이다.
1) Shader의 GetAnimationMatrix에서 보간작업 하기
matrix GetAnimationMatrix(VertexTextureNormalTangentBlend input)
{
    float indices[4] = { input.blendIndices.x, input.blendIndices.y, input.blendIndices.z, input.blendIndices.w };
    float weights[4] = { input.blendWeights.x, input.blendWeights.y, input.blendWeights.z, input.blendWeights.w };

    int animIndex = Keyframes.animIndex;
    int currFrame = Keyframes.currFrame;
    int nextFrame = Keyframes.nextFrame;
    float ratio = Keyframes.ratio;

    float4 c0, c1, c2, c3; // current
    float4 n0, n1, n2, n3; // next


    matrix curr = 0;
    matrix next = 0;
    matrix transform = 0;

    for (int i = 0; i < 4; i++)
    {
        c0 = TransformMap.Load(int4(indices[i] * 4 + 0, currFrame, animIndex, 0));
        c1 = TransformMap.Load(int4(indices[i] * 4 + 1, currFrame, animIndex, 0));
        c2 = TransformMap.Load(int4(indices[i] * 4 + 2, currFrame, animIndex, 0));
        c3 = TransformMap.Load(int4(indices[i] * 4 + 3, currFrame, animIndex, 0));
        curr = matrix(c0, c1, c2, c3);

        n0 = TransformMap.Load(int4(indices[i] * 4 + 0, nextFrame, animIndex, 0));
        n1 = TransformMap.Load(int4(indices[i] * 4 + 1, nextFrame, animIndex, 0));
        n2 = TransformMap.Load(int4(indices[i] * 4 + 2, nextFrame, animIndex, 0));
        n3 = TransformMap.Load(int4(indices[i] * 4 + 3, nextFrame, animIndex, 0));
        next = matrix(n0, n1, n2, n3);

        matrix result = lerp(curr, next, ratio);

        transform += mul(weights[i], result);
    }

    return transform;
}
4개의 뼈에 대해서 현재 상태와 다음 프레임의 상태를 구해줘서 그거를 최종 상태로 구해준 다음에 넘겨주면 된다.
2) ModelAnimator::Update에서 보간 작업 하기
보간하는 작업을 ModelAnimator::Update에서 이어서 작업을 해본다.
이것도 마찬가지로 복붙해서 원래 버전은 주석처리를 하고 작업을 한다.
보간 작업을 한다는 얘기는 시간이 보통은 인위적으로 흐르는게 아니라 자연스럽게 흐르는 경우가 많을 것이다.
	ImGui::InputInt("CurrFrame", (int*)&_keyframeDesc.currFrame);
	_keyframeDesc.currFrame %= _model->GetAnimationByIndex(_keyframeDesc.animIndex)->frameCount;
를 삭제하고
CurrFrame같은 경우 시간을 동작시켜서 진행을 해보도록 한다.
void ModelAnimator::Update()
{
	if (_model == nullptr)
		return;

	// TODO
	if (_texture == nullptr)
		CreateTexture();

	_keyframeDesc.sumTime += DT; // Time Manager에서 Delta Time을 추출하여 경과된 시간(초)을 얻는 방식입니다.

	shared_ptr<ModelAnimation> current = _model->GetAnimationByIndex(_keyframeDesc.animIndex);
	if (current)
	{
		float timePerFrame = 1 / (current->frameRate * _keyframeDesc.speed); // 1프레임 당 경과되어야 하는 시간
		if (_keyframeDesc.sumTime >= timePerFrame)
		{
			_keyframeDesc.sumTime = 0.f;
			_keyframeDesc.currFrame = (_keyframeDesc.currFrame + 1) % current->frameCount;
			_keyframeDesc.nextFrame = (_keyframeDesc.currFrame + 1) % current->frameCount;
		}

		_keyframeDesc.ratio = (_keyframeDesc.sumTime / timePerFrame); // 경과된 시간/1프레임당시간 0~1사이를 왔다갔다 하면서 이어지게 될 것이다.
	}

	// Anim Update
	ImGui::InputInt("AnimIndex", &_keyframeDesc.animIndex);
	_keyframeDesc.animIndex %= _model->GetAnimationCount();
	ImGui::InputFloat("Speed", &_keyframeDesc.speed, 0.5f, 4.f); )
이렇게 수정하고 빌드를 해서 실행을 해보면

보간이 되어 움직임이 부드러워졌다는 것을 알 수 있다.
이전 상태, 다음 상태, 그리고 현재에서 다음까지 몇 프로까지 됐는지를 0~1사이로 넣어주고 있기 때문에 그거에 따라서 달리고 있다는 걸 알 수 있다.
이걸 응용하면 된다.
10. 응용에 대해
여기서 더 한다면 3가지 정도로 볼 수 있는데
애니메이션이 넘어갈 때 자주 사용하는 것 중 하나가 멈춰 있다가 뛰었다가 멈췄다가 할 때 뛰다가 자연스럽게 멈춘다거나 하면 퀄리티에 도움이 된다.
transition time을 둬서 자연스럽게 멈춘다던가 할 수 있다.
그걸 하면 다른 애니메이션이랑 블렌딩을 한다거나 경우에 따라 대각선으로 가는 애니메이션이 필요하다면, fps 게임에서 둘을 보간해서 중간의 애니메이션을 틀어주는 그런 부분을 만드는 걸 고려할 수 있다.
기본적으로 스키닝 원리, 애니메이션이 동작하는 원리에 대해 이해 했으면 나머지 섞고 하는 부분은 크게 대단하게 어려운 부분은 아니다라고 볼 수 있다.
void AnimationDemo::CreateKachujin()
{
	shared_ptr<class Model> m1 = make_shared<Model>();
	m1->ReadModel(L"Kachujin/Kachujin");
	m1->ReadMaterial(L"Kachujin/Kachujin");
	m1->ReadAnimation(L"Kachujin/Idle");
	m1->ReadAnimation(L"Kachujin/Run");
	m1->ReadAnimation(L"Kachujin/Slash");

	_obj = make_shared<GameObject>();
	_obj->GetOrAddTransform()->SetPosition(Vec3(0, 0, 1));
	_obj->GetOrAddTransform()->SetScale(Vec3(0.01f));

	_obj->AddComponent(make_shared<ModelAnimator>(_shader));
	{
		_obj->GetModelAnimator()->SetModel(m1);
		//_obj->GetModelAnimator()->SetPass(1);
	}
}
이렇게 SetPass를 주석처리 하면

이렇게 보인다.
여기까지가 중요하고 나머지는 한번씩 연습해 보는 옵션이라 볼 수 있다.
다음에 해볼 거는 트위닝을 해보고 거기까지만 한다.
이 코드가 다른 메쉬를 사용할 경우 안 되는 경우가 있다. 그 때 마다 코드를 보고 수정하는 게 계속 될 것이다.
하지만 원리는 그대로다.
3대장
스키닝이란 무엇인가
애니메이션이라는 파일에는 무엇이 들어가 있는가
왔다갔다 하면서 글로벌에 있는 거를 relative로 바꿨다가 다시 global로 가는 거
이렇게 삼총사는 기억을 하자.
'DirectX' 카테고리의 다른 글
| 65. 애니메이션_SkyBox (0) | 2024.03.10 |
|---|---|
| 64. 애니메이션_애니메이션#4_tweening (0) | 2024.03.08 |
| 62. 애니메이션_애니메이션#2_CreateAnimationTransform, CreateTexture (0) | 2024.03.06 |
| 61. 애니메이션_애니메이션#1_ReadAnimation, ModelAnimator (0) | 2024.03.05 |
| 60. 애니메이션_애니메이션 데이터 (0) | 2024.03.04 |


댓글