1. GameObject 클래스
요약: Object 마다 가지고 있어야 할 내용들을 Game클래스에서 GameObject 클래스로 이동 시켰다.
1) GameObject.h에 Game.h의 내용 이전
Game.h에 필요한 건 뭘까?
	shared_ptr<Graphics> _graphics;
	shared_ptr<Pipeline> _pipeline;
두 개 뿐만 아니라
Game.h에 shared_ptr로 되어 있는 모든 물체들을 묶어서 관리할 필요가 생긴 것이다.
그리고 Game::Render에서 세팅해준 부분들이 방대하다.
void Game::Render()
{
	_graphics->RenderBegin();

	// IA - VS - RS - PS - OM
	{
		PipelineInfo info;
		info.inputLayout = _inputLayout;
		info.vertexShader = _vertexShader;
		info.pixelShader = _pixelShader;
		info.rasterizerState = _rasterizerState;
		info.blendState = _blendState;
		_pipeline->UpdatePipeline(info);

		_pipeline->SetVertexBuffer(_vertexBuffer);
		_pipeline->SetIndexBuffer(_indexBuffer);
		_pipeline->SetConstantBuffer(0, SS_VertexShader, _constantBuffer);
		_pipeline->SetTexture(0, SS_PixelShader, _texture1);
		_pipeline->SetSamplerState(0, SS_PixelShader, _samplerState);

		_pipeline->DrawIndexed(_geometry->GetIndexCount(), 0, 0);
	}

	_graphics->RenderEnd();
}
PipelineInfo라는 걸 물체마다 들고 있고, 그걸 이용해서 Pipeline에 딱 그려주면 되는 것이지, 지금처럼 Render에서 다 할 필요는 없다.
Game.h의
private:
	shared_ptr<Geometry<VertexTextureData>> _geometry;
	shared_ptr<VertexBuffer> _vertexBuffer;
	shared_ptr<IndexBuffer> _indexBuffer;
	shared_ptr<InputLayout> _inputLayout;

	shared_ptr<VertexShader> _vertexShader;
	shared_ptr<RasterizerState> _rasterizerState;
	shared_ptr<PixelShader> _pixelShader;
	shared_ptr<Texture> _texture1;
	shared_ptr<SamplerState> _samplerState;
	shared_ptr<BlendState> _blendState;
이게 파이프라인이니까 공용으로 관리하기 때문에 객체가 여러개 있어도 동일한 내용을 들고 있겠지만, 기본적으로 객체마다 세팅을 해줘야 한다. 그렇다고 매 객체마다 고쳐줄 필요는 없다. 물론 첫 번째 물체와 다음 물체가 다른 셰이더를 사용하다면 _pipeline의 정보들이 교체가 될 수 밖에 없다. 하지만 동일한 형태의 오크 100마리면, _pipeline을 매번 갱신할 필요 없이 한 번만 세팅하고 100마리를 다 그려준 다음에 다음 턴에 오크가 아닌 다른 애들을 그려주면 성능상 좋을 거다. 같은 애들끼리 모여 있는게 좋다.
Pipeline 필터에 GameObject 필터를 추가한다.
유니티 방식으로 만들어줄 것이다.
GameObject라는 애가 대장 역할을 한다.(언리얼로 치면 Actor)
일단 GameObject 클래스를 만들어서 이미지 하나를 띄우는 걸 이 하나의 클래스로 묶어서 관리 하는 걸 목적으로 한다.
Game.h에서 또 무엇을 옮겨야 할까?
private:
	shared_ptr<Geometry<VertexTextureData>> _geometry;
	shared_ptr<VertexBuffer> _vertexBuffer;
	shared_ptr<IndexBuffer> _indexBuffer;
	shared_ptr<InputLayout> _inputLayout;

	shared_ptr<VertexShader> _vertexShader;
	shared_ptr<RasterizerState> _rasterizerState;
	shared_ptr<PixelShader> _pixelShader;
	shared_ptr<Texture> _texture1;
	shared_ptr<SamplerState> _samplerState;
	shared_ptr<BlendState> _blendState;

private:
	TransformData _transformData;
	shared_ptr<ConstantBuffer<TransformData>> _constantBuffer;

	Vec3 _localPosition = { 0.f, 0.f, 0.f };
	Vec3 _localRotation = { 0.f, 0.f, 0.f };
	Vec3 _localScale = { 1.f, 1.f, 1.f };
Game::Render에서 _pipeline을 세팅하는데 사용되던 이 내용들을 GameObject.h로 이전시켜 주자.
나중엔 이걸 resource로 묶어서, GameObject가 100마리 생긴다고 이걸 100개 만들 필요는 없다.
지금 단계에서는 위치를 잡는 단계라고 보면 된다.
옮기고
ComPtr<ID3D11Device> _device;
를 추가한다.
	shared_ptr<Geometry<VertexTextureData>> _geometry;
	shared_ptr<VertexBuffer> _vertexBuffer;
	shared_ptr<IndexBuffer> _indexBuffer;
	shared_ptr<InputLayout> _inputLayout;
이것들은 GameObject가 어떻게 생겼는지 나타내는 부분이었다.
        shared_ptr<VertexShader> _vertexShader;
	shared_ptr<RasterizerState> _rasterizerState;
	shared_ptr<PixelShader> _pixelShader;
	shared_ptr<Texture> _texture1;
	shared_ptr<SamplerState> _samplerState;
	shared_ptr<BlendState> _blendState;
_vertexShader와 _pixelShader는 Default.hlsl 셰이더와 연관 있는 부분이었고,
_texture1와 _constantBuffer는 사실상 vertexShader, pixelShader 단계에서 꽂아줄 수 있는 함수 인자 같은 개념이었고,
rasterizer, sampler, blend는 옵션으로 설정할 수 있는 그런 부분이었다고 결론을 내릴 수 있다.
이거를 다 이용해서 그려준다고 가정을 해보자.
일단 생성자, 소멸자를 짝으로 만들어준다.
GameObject(ComPtr<ID3D11Device> device, ComPtr<ID3D11DeviceContext> deviceContext);
~GameObject();
그 다음에
void Update();
void Render(shared_ptr<Pipeline> pipeline);
이렇게 함수가 있을 것이다.
#pragma once
class GameObject
{
public:
	GameObject(ComPtr<ID3D11Device> device, ComPtr<ID3D11DeviceContext> deviceContext);
	~GameObject();

	void Update();
	void Render(shared_ptr<Pipeline> pipeline);

private:
	ComPtr<ID3D11Device> _device;

	shared_ptr<Geometry<VertexTextureData>> _geometry;
	shared_ptr<VertexBuffer> _vertexBuffer;
	shared_ptr<IndexBuffer> _indexBuffer;
	shared_ptr<InputLayout> _inputLayout;

	shared_ptr<VertexShader> _vertexShader;
	shared_ptr<RasterizerState> _rasterizerState;
	shared_ptr<PixelShader> _pixelShader;
	shared_ptr<Texture> _texture1;
	shared_ptr<SamplerState> _samplerState;
	shared_ptr<BlendState> _blendState;

private:
	TransformData _transformData;
	shared_ptr<ConstantBuffer<TransformData>> _constantBuffer;

	Vec3 _localPosition = { 0.f, 0.f, 0.f };
	Vec3 _localRotation = { 0.f, 0.f, 0.f };
	Vec3 _localScale = { 1.f, 1.f, 1.f };
};
헤더를 만들었으니,
함수들을 구현해준다.
2) Game::Init 내용을 GameObject의 생성자로 이전하고, 그 자리에 _gameObject = make_shared<GameObject>(_graphics->GetDevice(), _graphics->GetDeviceContext());
일단 GameObject 생성자부터 구현한다.
GameObject::GameObject(ComPtr<ID3D11Device> device, ComPtr<ID3D11DeviceContext> deviceContext)
	: _device(device)
{
Game::Init에서 _hwnd, graphics, _pipeline빼고 나머지를 GameObject 생성자에 복붙한다.
_geometry = make_shared<Geometry<VertexTextureData>>();
GeometryHelper::CreateRectangle(_geometry);
이 두줄을 맨 위로 올려서 먼저 사각형을 만든다.
생성자에서 device를 매개변수로 받아왔으니 _graphics→GetDevice()를 device로 바꿔준다.
순서를 보면 _geometry가 먼저 만들어 지고 기하학적인 도형을 표현한다.
GPU에게 이런 도형을 만들어 줘라고 건내주는 게 VertexBuffer다.
그리고 Create를 호출해서 이 도형을 토대로 한 데이터를 GPU에게 복사해서 들고 있어라고 한다. 나중에 GPU에서 어디에 그려줄지를 셰이더를 통해서 연산할 예정이니 전달해준 것이다.
인덱스 버퍼도 기하학적인 도형을 표현하는 애다.
그 다음 inputLayout 은 기하학적 도형을 어떻게 생겼는지 GPU와 셰이더랑 연결하는 단계다.
근데 그 전에 셰이더를 만들어줘야 하니 VertexShader를 만들어 주고, 이 셰이더를 컴파일 해서 blob으로 만들어 주는 단계가 선행이되어야 한다. InputLayou을 만들 때 셰이더에 넘기는 데이터들이 어떻게 구성이 되어있는지를 설명하는 부분이다.
PixelShader, 그 다음에 Rasterizer,
BlendState에서 마지막 결과물이 어떻게 섞여야 할지,
constantBuffer에서만 deviceContext를 사용하기 때문에 deviceContext를 따로 변수에 저장 않고 사용하였다.
texture, samplerState도 둘둘씩 묶어서 배치해준다.
그럼 다음과 같이 코드가 정리된다.
GameObject::GameObject(ComPtr<ID3D11Device> device, ComPtr<ID3D11DeviceContext> deviceContext)
	: _device(device)
{
	_geometry = make_shared<Geometry<VertexTextureData>>();
	GeometryHelper::CreateRectangle(_geometry);

	_vertexBuffer = make_shared<VertexBuffer>(device);
	_vertexBuffer->Create(_geometry->GetVertices());

	_indexBuffer = make_shared<IndexBuffer>(device);
	_indexBuffer->Create(_geometry->GetIndices());

	_vertexShader = make_shared<VertexShader>(device);
	_vertexShader->Create(L"Default.hlsl", "VS", "vs_5_0");

	_inputLayout = make_shared<InputLayout>(device);
	_inputLayout->Create(VertexTextureData::descs, _vertexShader->GetBlob());

	_pixelShader = make_shared<PixelShader>(device);
	_pixelShader->Create(L"Default.hlsl", "PS", "ps_5_0");

	_rasterizerState = make_shared<RasterizerState>(device);
	_rasterizerState->Create();

	_blendState = make_shared<BlendState>(device);
	_blendState->Create();

	_constantBuffer = make_shared<ConstantBuffer<TransformData>>(device, deviceContext);
	_constantBuffer->Create();

	_texture1 = make_shared<Texture>(device);
	_texture1->Create(L"chiikawa.png");

	_samplerState = make_shared<SamplerState>(device);
	_samplerState->Create();
}
물체마다 이런 식으로 만들어 주는 부분이 들어갈텐데,
나중에 가면 일부 부품들은 리소스 매니져를 통해서 키 값으로 얻어오는 식으로 바뀌게 될 것이다.
지금 단계에서는 Game에서 관리 할 것이 아니라,
객체마다 들고 있어야하 하는 부품들이라 그렇게 할 수 있게 한 것이다.
Game::Update를 할 때는 좌표 변화가 일어날 것이다.
일단 Gmae::Init에서 GameObject로 이미 옮겨준 코드들을 삭제한다.
삭제한 자리엔 GameObject를 이용해서 같은 내용을 넣으면 된다. 아래에서 추가해 줄 것이다.
3) Game::Update 내용을 GameObject::Update로 이전 하고, 그 자리에 _gameObject->Update()
Game::Update의 내용들도 사실상 Game과 관련되어 있는게 아니라, 특정한 물체랑 관련이 있는 부분이다.
GameObject::Update로 옮겨준다.
void GameObject::Update()
{
	_localPosition.x += 0.001f;

	Matrix matScale = Matrix::CreateScale(_localScale / 3);
	Matrix matRotation = Matrix::CreateRotationX(_localRotation.x);
	matRotation *= Matrix::CreateRotationY(_localRotation.y);
	matRotation *= Matrix::CreateRotationZ(_localRotation.z); // x,y,z 축 회전 행렬 곱하는 순서는 상관 없다.
	Matrix matTranslation = Matrix::CreateTranslation(_localPosition);

	Matrix matWorld = matScale * matRotation * matTranslation; // SRT
	_transformData.matWorld = matWorld;

	_constantBuffer->CopyData(_transformData);
}
결국 물체에 종속적인 부분이 더 많았던 것이다.
4) Game::Render의 내용을 GameObject.Render로 이전하고, 그 자리에 _gameObject->Render(_pipeline);
GameObject::Render(shared_ptr<Pipeline> pipeline)를 할 때 인자로 pipeline을 줬는데 이걸 이용할 수 있게 Game::Render의 RenderBegin, RenderEnd 사이 코드를 복붙한다.
void GameObject::Render(shared_ptr<Pipeline> pipeline)
{// IA - VS - RS - PS - OM
	{
		PipelineInfo info;
		info.inputLayout = _inputLayout;
		info.vertexShader = _vertexShader;
		info.pixelShader = _pixelShader;
		info.rasterizerState = _rasterizerState;
		info.blendState = _blendState;
		pipeline->UpdatePipeline(info);

		pipeline->SetVertexBuffer(_vertexBuffer);
		pipeline->SetIndexBuffer(_indexBuffer);
		pipeline->SetConstantBuffer(0, SS_VertexShader, _constantBuffer);
		pipeline->SetTexture(0, SS_PixelShader, _texture1);
		pipeline->SetSamplerState(0, SS_PixelShader, _samplerState);

		pipeline->DrawIndexed(_geometry->GetIndexCount(), 0, 0);
	}
}
이렇게 GameObject::Render로 코드를 옮겼다.
5) Game에서 이주시킨 코드가 있던 자리에 GameObject를 이용해 같은 내용으로 채워주기
Game.h로 가서 지금까지 옮겨준 부분들은 삭제한다.
Game.h에
#include GameObject.h를 추가한다.
그리고 GameObject로 같은 내용을 그 자리에 넣어준다.
Game.h에
shared_ptr<GameObject> _gameObject;
를 넣어준다.
이 아이가 나중에 가면, Scene에 배치된 여러가지 오브젝트들이 된다. 플레이어, 몬스터들의 각각이 이런식으로 등장하게 될 것이다. 하나만 들고 있는게 아니라 vector나 map으로 무엇인가로 여러개를 동시에 들고 있는 식으로 만들어지게 된다고 볼 수 있다.
이 _gameObject를 Game::Init에서
void Game::Init(HWND hwnd)
{
	_hwnd = hwnd;

	_graphics = make_shared<Graphics>(hwnd);
	_pipeline = make_shared<Pipeline>(_graphics->GetDeviceContext());

	_gameObject = make_shared<GameObject>(_graphics->GetDevice(), _graphics->GetDeviceContext());
}
이렇게 gameObject를 만들었다. 나중에는 Scnene에다가 배치를 해야 한다.
Update 할 때는
void Game::Update()
{
	_gameObject->Update();
}
이렇게 매 프레임마다 원하는 계산을 하게 해주고,
Game::Render에서 RenderBegin, RenderEnd사이의 복붙 하는데 썼던 코드를 삭제하고, 그 자리에
모든 오브젝트들을 하나씩 순회를 하면서, Render를 하면서 _pipeline을 건내준다.
void Game::Render()
{
	_graphics->RenderBegin();

	// IA - VS - RS - PS - OM
	{
		_gameObject->Render(_pipeline);
	}

	_graphics->RenderEnd();
}
Win API에서 HDC와 유사한 것이다.
빌드를 해보면 잘 된다. 실행을 해도 잘 나온다.
6) 결론
시작할 때는 방대 했지만, 옮기고 배치하니까 정리가 되었다.
Graphics는 device, deviceContext, RenderTargetView같은 핵심적인, 변하지 않는 애들이 배치되어 있는 곳이고,
Pipeline은 렌더링 파이프라인을 묘사하는, 실시간으로 렌더링 파이프라인에 세팅할 수 있는 것을 매핑을 해서 관리하는 부분이고,
GameObject는 Object 마다 갖고 있는 자신만의 정보를 들고 있을 것이고, 그것을 토대로 GameObject::Render에서 그림이 그려질 것이다.
가 결론이다.
물체가 100만개면, 100만개 업데이트 하지 않게 개선을 해줘야 한다.
동일한 물체 끼리 같은 건 Resource로 빼서 공용으로 관리하게 할 것이고,
_transformData, _constantBuffer는 물체마다 다른 것이니 물체마다 들고 있게 할 것이다.
이걸 한번 더 이전시켜야 한다.
큰 틀에서 봤을 때 RenderingPipeline단계가 이렇게 등장하게 된 것이다가 결론이다.
이제 매니져 복원 시키고, 카메라 등장시키면 된다 .
2. GameObject 클래스를 활용하여 사각형 출력하기
GameObject에서
shared_ptr<Geometry<VertexTextureData>> _geometry;
VertexTextureData를 이용해서 texture를 그리고 있지만
만약에 VertexColorData를 사용해서 빨강색 사각형을 그리고 싶다면 그것도 가능하다.
GameObjec.h에서
//shared_ptr<Geometry<VertexTextureData>> _geometry;
shared_ptr<Geometry<VertexColorData>> _geometry;
이렇게 바꿔주고,
GameObject::GameObject에서
GameObject::GameObject(ComPtr<ID3D11Device> device, ComPtr<ID3D11DeviceContext> deviceContext)
	: _device(device)
{
	//_geometry = make_shared<Geometry<VertexTextureData>>();
	_geometry = make_shared<Geometry<VertexColorData>>();
	GeometryHelper::CreateRectangle(_geometry, Color{1.0f, 0.f, 0.f, 1.0f});

	_vertexBuffer = make_shared<VertexBuffer>(device);
	_vertexBuffer->Create(_geometry->GetVertices());

	_indexBuffer = make_shared<IndexBuffer>(device);
	_indexBuffer->Create(_geometry->GetIndices());

	_vertexShader = make_shared<VertexShader>(device);
	_vertexShader->Create(L"Default.hlsl", "VS", "vs_5_0");

	_inputLayout = make_shared<InputLayout>(device);
	//_inputLayout->Create(VertexTextureData::descs, _vertexShader->GetBlob());
	_inputLayout->Create(VertexColorData::descs, _vertexShader->GetBlob());
이렇게 수정을 해주고,
탐색기에서 Default.hlsl을 복제해준 다음에 Color.hlsl로 이름을 바꾼다.
그리고 98. Shaders 필터에 추가한다.
우클릭, Properties에 들어가서, HLSL Compiler의 General에서
Entrypoint Name은 VS로, Shader Model은 5.0으로, Shader Type은 Vertex Shader로 바꿔주고,
Color.hlsl로 가서 Color 버전으로 복원을 해준다.
struct VS_INPUT
{
    float4 position : POSITION;
    float4 color : COLOR;
};

struct VS_OUTPUT
{
    float4 position : SV_POSITION;
    float4 color : COLOR;
};

cbuffer TransformData : register(b0)
{
    row_major matrix matWorld;
    row_major matrix matView;
    row_major matrix matProjection;
}

VS_OUTPUT VS(VS_INPUT input)
{
    VS_OUTPUT output;

    // WVP
    float4 position = mul(input.position, matWorld); // W
    position = mul(position, matView); // V
    position = mul(position, matProjection); // P

    output.position = position;
    output.color = input.color;

    return output;
}

Texture2D texture0 : register(t0);

SamplerState sampler0 : register(s0);

float4 PS(VS_OUTPUT input) : SV_Target
{
    return input.color;
}
그리고 GameObject.cpp의 생성자도
  	_vertexShader = make_shared<VertexShader>(device);
	_vertexShader->Create(L"Color.hlsl", "VS", "vs_5_0");

	_inputLayout = make_shared<InputLayout>(device);
	//_inputLayout->Create(VertexTextureData::descs, _vertexShader->GetBlob());
	_inputLayout->Create(VertexColorData::descs, _vertexShader->GetBlob());

	_pixelShader = make_shared<PixelShader>(device);
	_pixelShader->Create(L"Color.hlsl", "PS", "ps_5_0");
이렇게 해주면,
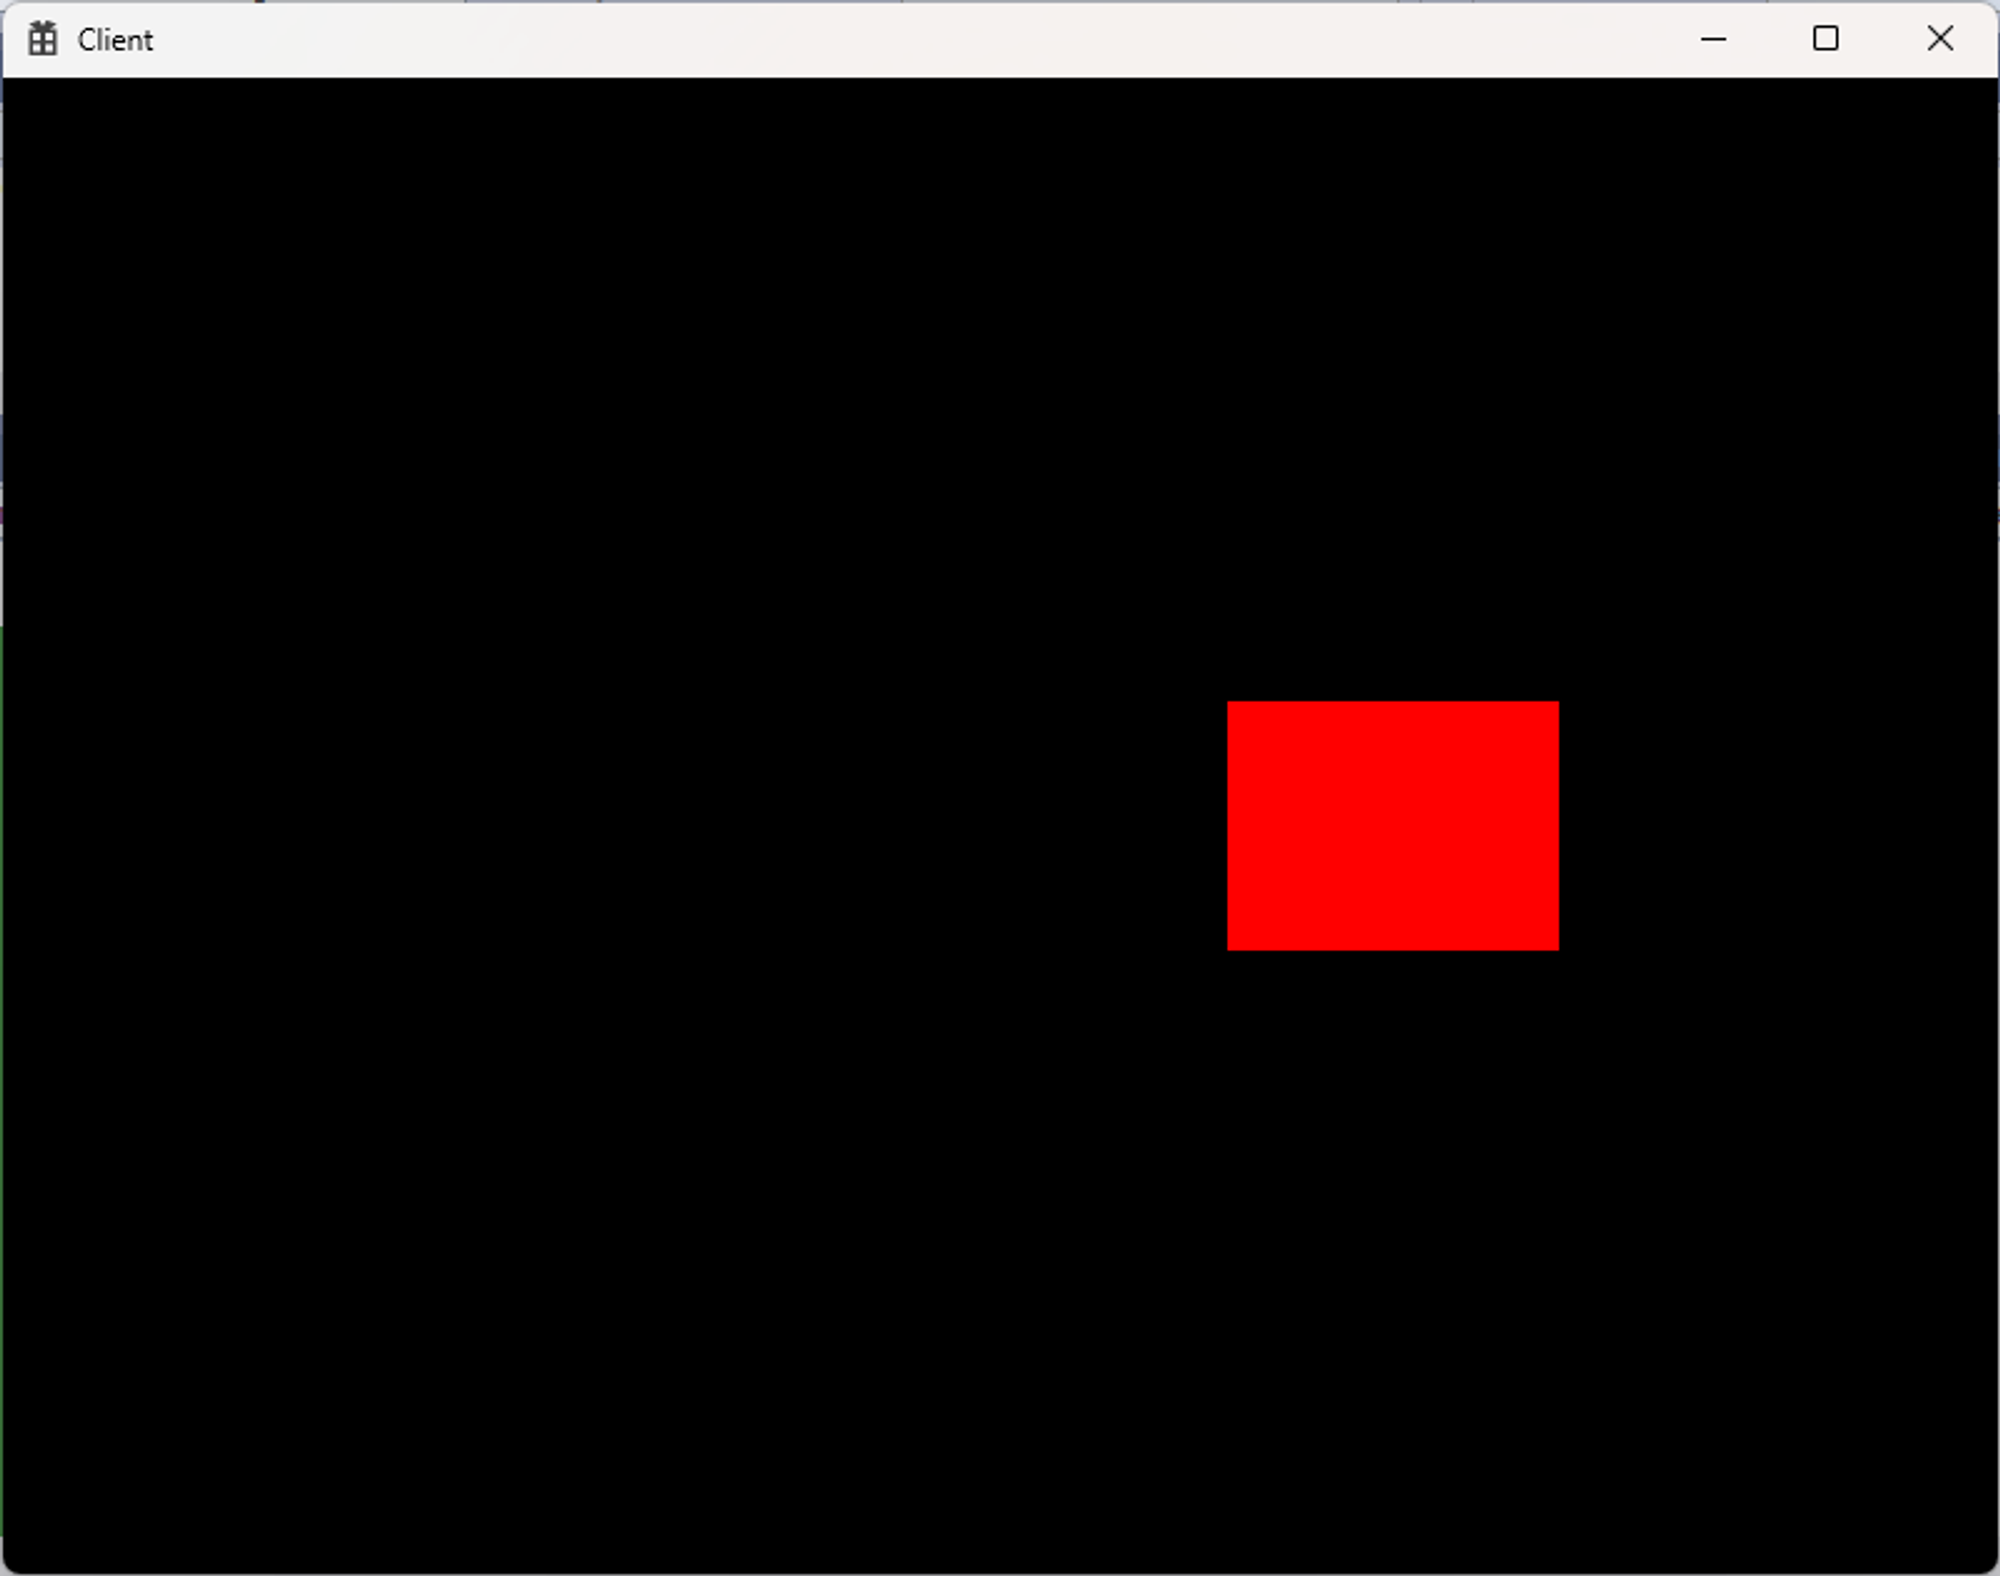
이렇게 치이카와가 아닌 사각형이 나오게 된다.
'DirectX' 카테고리의 다른 글
| 25. 엔진구조_MeshRenderer (0) | 2024.01.19 |
|---|---|
| 24. 엔진구조_Component (0) | 2024.01.17 |
| 21. 프레임워크 제작_Pipeline (0) | 2024.01.05 |
| 20. 프레임워크 제작_Shader (0) | 2024.01.03 |
| 19. 프레임워크 제작_Geometry (0) | 2024.01.02 |

댓글